Quantcast
Channel: Security – Red Hat Developer
Viewing all 54 articles
Browse latest View live

Using Snyk, NSP and Retire.JS to Identify and Fix Vulnerable Dependencies in your Node.js Applications

$
0
0

Introduction

Dependency management isn’t anything new, however, it has become more of an issue in recent times due to the popularity of frameworks and languages, which have large numbers of 3rd party plugins and modules. With Node.js, keeping dependencies secure is an ongoing and time-consuming task because the majority of Node.js projects rely on publicly available modules or libraries to add functionality. Instead of developers writing code, they end up adding a large number of libraries to their applications. The major benefit of this is the speed at which development can take place. However, with great benefits can also come great pitfalls, this is especially true when it comes to security. As a result of these risks, the Open Web Application Security Project (OWASP) currently ranks “Using Components with Known Vulnerabilities” in the top ten most critical web application vulnerabilities in their latest report.

Introducing Risk through Rapid Development

The over-reliance on using 3rd party modules to implement functionality in your applications can cause vulnerabilities to unknowingly creep into your applications. Some of these vulnerabilities can appear out of the box when you install the module. For example, the popular shelljs module at the time of writing has had over 481,000 downloads in the last day.

NPM

However, installing this module will introduce a command injection vulnerability. This affects every version of shelljs from 0.0.1 to 0.7.7.

ShellJS Version 0.0.1

ShellJS Version 0.7.7

This is a cause of concern when considering that there have been over 11 million downloads in the last month alone. Furthermore, other popular and well-known modules that recently contained vulnerabilities include:

Angular@1->1.6.2

Express@4.14.0

Request@2.67.0

The Problems

When a user does an npm install of a module and has an entry created in the package.json of their application, it can often be left to remain at that version unless a developer requires functionality that only exists in a newer version of that module. However, as time goes on, vulnerabilities can be found by researchers or in the wild in these outdated versions. Therefore, it’s important to monitor dependency vulnerability creep.

The Solution(s)

If old modules can become prone to vulnerabilities over time and the latest module versions could potentially be free of vulnerabilities, then we could actively update all of our modules’ dependencies once newer versions of them are published. However, this can involve a lot of work and repetition, particularly where there are a large number of dependencies in each application.

There are a number of tools available that help you keep your dependencies up to date, one of them is Greenkeeper.

Greenkeeper is a tool for dependency management and provides GitHub integration. Greenkeeper can be configured to automatically update your dependencies to their latest versions without any manual intervention. Greenkeeper will also ensure that it doesn’t introduce breaking changes by running npm test before merging in dependency version bumps, so you can rest assure that stability won’t be affected. Greenkeeper provides a great solution for automating the tedious task of dependency management with a minimal and straightforward setup.

NPM

Whilst Greenkeeper and similar tools are a great option for ensuring that you are using the latest versions of your dependencies, it doesn’t ensure you are using the vulnerability free versions of your dependencies.

The main issue with these types of tools can be described by using the npm module Hawk as a use case.

  1. A developer installs hawk using npm install hawk --save and it adds the entry "hawk": "3.1.3" to the ofpackage.json the application.
  2. The developer then decides down the line that they should introduce dependency management automation to their project.
  3. When Greenkeeper analyses the application and notices that there is an outdated version of hawk being used in one or more of the applications, Greenkeeper issues a fix and updates it to the latest available version "4.0.0".

While this may seem to be a nice automation improvement, it can also backfire….

Hawk Version 3.1.3

Hawk Version 4.0.0

Spot the problem?

Remember, the latest version is not necessarily the safest version. Vulnerabilities can still be introduced in new versions. Is Greenkeeper or a similar solution the answer to keeping my dependencies vulnerability free? The short answer is, unfortunately, no.

The Better Solutions

 NSP (nodesecurity.io)

The first security focused dependency management tool I’m going to talk about is NSP, which stands for the Node Security Platform. They provide a command line tool and some very nice Github Integration. There is a service called nsp Live that is free for open source and it allows for real-time checks with CI support, along with GitHub PR integration.

NSP provides easy Github Integration and prevents you from introducing vulnerable versions of Modules in your applications.

After installing the command line tool, you can check for vulnerabilities in your project by running nsp check --output summary. You can also output to JSON format if you would like to use the data in other programs or tooling by using --output json. The command line tool is very simple, but it does the job of highlighting vulnerabilities in your Node.js applications.

Pros

  • Free for Open Source.
  • Github Integration
  • Useful Output Formats when Using the CLI tool.
  • Add vulnerabilities to ignore.

Installation

NPM

Usage

nsp check Test for any known vulnerabilities.

 Snyk (snyk.io)

Snyk offers the best of both worlds. It has a feature-rich command line tool, along with an excellent web application that provides a great UI for finding and reviewing security vulnerabilities. Just like NSP, it also provides great Github integration and checks for new vulnerabilities introduced through pull requests. The command line tool provided by Snyk will not only report vulnerabilities in components, but it will also offer to fix them with their wizard tool. Moving from the command line to the Snyk website, it’s easy to test NPM modules for vulnerabilities, view a dashboard listing the vulnerabilities in your current project and configure your Github settings.


Snyk provides an interactive command line tool to easily mitigate vulnerabilities in your applications.

Snyk does a good job of creating a great end user experience, along with providing very feature rich tools and integrations to help keep your dependencies vulnerability free.

Pros

  • Free for Open Source.
  • Excellent Github Integration.
  • Feature rich Website.
  • Provides an easy way to test a public npm module & version for vulnerabilities.
  • Email alerts for new vulnerabilities.
  • Automatically open’s fix PR’s if a fix is available.
  • Sleek dashboard for viewing current vulnerabilities in your projects.

Installation

NPM

Usage

snyk test Test for any known vulnerabilities.

snyk wizard Configure your policy file to update, auto patch and ignore vulnerabilities.

snyk protect Protect your code from vulnerabilities and optionally suppress specific vulnerabilities.

snyk monitor Record the state of dependencies and any vulnerabilities on snyk.io.

 Retire.js (retirejs.github.io)

Retire.js is a very thorough vulnerability scanner for javascript libraries. Although Retire.js doesn’t provide the web application features or Github integration like Snyk or NSP, it makes up for it in other ways.

Along with finding vulnerabilities in Node.js modules, it also scans for vulnerabilities in Javascript libraries. This is very useful in finding vulnerabilities that you didn’t realize existed if you previously only used NSP or Snyk to secure your dependencies.

Retire.js is run primarily using their command line tool, but it can also be used in a number of different ways:

  • As a grunt plugin
  • As a gulp task
  • As a Chrome extension
  • As a Firefox extension
  • As a Burp Plugin
  • As an OWASP Zap plugin

Pros

  • Completely Free!
  • Very Versatile and Thorough Scanner.
  • Reports vulnerabilities in Javascript libraries, not just Node Modules.
  • Plugins are available for popular intercepting proxies and penetration testing tools.
  • Their website captures vulnerable library versions concisely in a table.
  • Extensive scanning options: paths, folders, proxies, node/JS only, URL etc.
  • Add vulnerabilities to ignore.
  • Passive scanning using the browser plugin.

Installation

NPM

NPM

Burp Suite/OWASP Zap Plugin

Usage

retire --package limit node scan to packages where parent is mentioned in package.json.

retire --node Run node dependency scan only.

retire --js Run scan of JavaScript files only.

--jspath <path> Folder to scan for javascript files

--nodepath <path> Folder to scan for node files

--path <path> Folder to scan for both

--jsrepo <path|url> Local or internal version of repo

--noderepo <path|url> Local or internal version of repo

--proxy <url> Proxy url (http://some.sever:8080)

--outputformat <format> Valid formats: text, json

--outputpath <path> File to which output should be written

--ignore <paths> Comma delimited list of paths to ignore

--ignorefile <path> Custom ignore file, defaults to .retireignore / .retireignore.json

--exitwith <code> Custom exit code (default: 13) when vulnerabilities are found

Conclusion

Dependency vulnerability management can be a very tedious, repetitive and time-consuming task if done manually. The above-mentioned tools can greatly increase both vulnerability visibility and mitigation without too much manual intervention. Here are some quick tips to help stay on top of these vulnerabilities:

  1. Set up Github PR security checks to catch vulnerabilities being introduced with a new code.
  2. Setup email alerts so you will be notified if a new vulnerability has been found in a module that you are using.
  3. Do regular vulnerability scans in your projects and modules.
  4. Test for vulnerabilities in Javascript libraries, not just Node.js modules.
  5. Report new vulnerabilities in your issue tracker so they won’t be forgotten about!

Remember that vulnerabilities will creep in over time and it will need to be managed. Security is an ongoing process, but active monitoring and alerts by using some automated tooling can go a long way to help you stay on top of these risks!

In upcoming posts, I’m going to look at attack and defense mechanisms for injection attacks in web & mobile applications and further automating security checks in the logic of the application, rather than in its dependencies.


The Red Hat Mobile Application Platform is available for download.

Share


How to implement a new realm in Tomcat

$
0
0

Tomcat by default ships with a couple of Realm implementations like, JDBCRealmDataSourceRealm, and JNDIRealm etc. But sometimes it is not sufficient for your organization’s requirements and you are required to apply your own implementations.

How to implement a custom realm in Tomcat?

You can create your own realm by extending RealmBase class; here I am going to show an example of implementing a new Realm in Tomcat.

Here is a sample code snip for implementing a new Realm by extending RealmBase class:

package com.sid.realm;
import java.security.Principal;
import java.util.ArrayList;
import java.util.List;
import org.apache.catalina.realm.RealmBase;
import org.apache.catalina.realm.GenericPrincipal;
import org.jboss.logging.Logger;
 /*
 * @author siddhartha
 */
public class NewRealm extends RealmBase {

 private String username;
 private String password;
 protected static Logger log = Logger.getLogger(NewRealm.class);

 @Override
 public Principal authenticate(String username, String credentials) {

 this.username = username;
 this.password = credentials;
 log.info("Authentication is taking place with userid: "+username);
 /* authentication just check the username and password is same*/
 if (this.username.equals(this.password)) {
   return getPrincipal(username);
  }else{
   return null;
  }
 }
 @Override
 protected String getName() {
  return username;
 }

 @Override
 protected String getPassword(String username) {
  return password;
 }

 @Override
 protected Principal getPrincipal(String string) {
  List<String> roles = new ArrayList<String>();
  roles.add("TomcatAdmin");  // Adding role "TomcatAdmin" role to the user
  log.info("Realm: "+this);
  Principal principal = new GenericPrincipal(username, password,roles);
  log.info("Principal: "+principal);
  return principal;
 }
}

This code can be compiled using maven by executing following instructions:

  1. Create a project using maven by executing the below command.
    mvn archetype:generate -DgroupId=com.sid.realm -DartifactId=realm -DarchetypeArtifactId=maven-archetype-quickstart -DinteractiveMode=false
  2. Place NewRealm.java at src/main/java/com/sid/realm.
  3. Edit pom.xml and add the following dependencies.
     <dependencies>
      <dependency>
       <groupId>org.apache.tomcat</groupId>
       <artifactId>tomcat-catalina</artifactId>
       <version>7.0.27</version>
       <type>jar</type>
      </dependency>
     </dependencies>
  4. Execute the command below to build the package.
    mvn clean package
  5. If the build is successful, it will generate realm-1.0-SNAPSHOT.jar at target directory, place this jar at $CATALINA_HOME/lib.
  6. Now make the following changes in $CATALINA_HOME/conf/server.xml, if you want to enable this realm for all the application deployed in Tomcat. If you want to enable this realm for a specific application, make the following changes in context.xml placed at application’s META-INF folder.
    <Realm className ="com.sid.realm.NewRealm"/>
  7. Start tomcat and test your application now.

Note: In the code, role is set as TomcatAdmin, make sure the same role is implemented in web.xml in your application, or you may get a 403 error.

POC is available at GitHub


Whether you are new to Linux or have experience, downloading this cheat sheet can assist you when encountering tasks you haven’t done lately.

Share

The Diamond in the Rough: Effective Vulnerability Management with OWASP DefectDojo

$
0
0

Managing the security of your projects applications can be an overwhelming and unmanageable task. In today’s world, the number of newly created frameworks and languages is continuing to increase and they each have their own security drawbacks associated with them.

The wide variety of security scanners available can help find vulnerabilities in your projects, but some scanners only work with certain languages and they each have different reporting output formats. Creating reports for customers or managers and viewing analytics using different security tools in different projects can be a very time-consuming task.

Enter DefectDojo.

DefectDojo Logo

DefectDojo is an Open Source Vulnerability Management Tool that helps to automate and reduce the time that a security engineer needs to spend in the application security process. DefectDojo will help a security engineer to spend more time carrying out security investigations and finding vulnerabilities instead of creating reports and creating metrics.

Features

DefectDojo Dashboard

The DefectDojo dashboard gives you a summary and health check of your overall product security engagements. You can see the number of engagements that are currently taking place as well as vulnerability findings statistics for the past week.

These quick statistics can help you keep on top of recent findings, and ensure that the vulnerability count doesn’t steadily creep on a weekly basis. There are also findings charts to track the severity of reported vulnerabilities by overall count and per month.

DefectDojo Dashboard

Adding Vulnerability Findings

A vulnerability ‘finding’ in an app or project can be added manually into DefectDojo so it can be tracked. Furthermore, in situations where you think there might be a vulnerability in an application, but you are not entirely sure if it’s an issue (or needs more investigation), you can add it as a ‘potential finding’ where it can later be promoted to a verified finding if it is actually a security concern.

DefectDojo Supported Scanners

Along with manually adding vulnerability findings, DefectDojo allows you to import scan results using a number of penetration testing tools and scanners:

  1. Burp Suite (XML)
  2. Nessus (CSV, XML)
  3. Nexpose (XML)
  4. ZAP (XML)
  5. Veracode (XML)
  6. Checkmarx (XML)
  7. AppSpider (XML)
  8. Arachni Scanner (JSON)
  9. Visual Code Grepper (CSV, XML)
  10. OWASP Dependency Check (XML)
  11. Retire.js JavaScript Scan (JSON)
  12. Node Security Platform (JSON)

(There is also support for Qualys and Snyk scan imports coming soon.)

DefectDojo will parse the reports from any of the above penetration testing tools so you can have all your findings in the one place from multiple tools. The scanner consolidation feature will prevent duplicate findings being created by doing comparisons of previous findings to see if the issue has already been reported.

If you also want to add manual findings in a certain format or have a tool that outputs to CSV format, there is an option to import generic findings using the CSV import format.

Finding Templates

One repetitive task for any security engineer is having to re-explain/document re-occurring vulnerability types between applications or projects. To help save time writing the same information over and over, you can simply write a finding ‘template’. With these templates, you can add information about a certain re-occurring vulnerability type to a base template, which can later be modified.

The key benefit here is the time saved when explaining common vulnerabilities. If a vulnerability needed to be manually explained each time for a different application or project, key information or explanation details can potentially be left out over time if an engineer begins to shorten down lengthy explanations.

Predefined templates will save not only a security engineer time, but it will also provide more detailed information for your popular vulnerability findings every single time.

Metrics

DefectDojo offers in-depth metrics across the board. Is very easy to see overview metrics across products, engagements, and individual scans. Furthermore, a lot of the pages allow you to see charts for the findings that are contained within tables in the user interface. This is a nice way to see a thorough visual representation of some specific findings data whether it’s for an overall product or a subset of some scan findings.

Reporting

One of the most powerful and time-saving features of DefectDojo is the reporting functionality. DefectDojo will allow you to generate reports from areas like individual scans, engagements, and products. These reports can be generated in either PDF or AsciiDoc format.

Furthermore, you can also generate tailored custom reports and use robust filtering to only document the vulnerability findings you want.

These custom reports allow you to choose what you want in the report. The report builder features an intuitive drag and drop system and allows you to include the following elements to make the report as detailed as you need it:

  • Cover Page
  • Table of Contents
  • WYSIWYG Content
  • Findings List
  • Endpoint List
  • Page Breaks

DefectDojo API

DefectDojo also features an API that can be used to interact with the solution. One of the most useful endpoints in the API is the importScan endpoint. This will allow you to import scan results directly into DefectDojo. This can be used to greatly enhance your security automation pipeline by automatically sending scan results from penetration testing tools to the DefectDojo API to be processed.

{
"minimum_severity": "", # Minimum Severity to Report
"scan_date": "datetime", # Date of the Scan
"verified": false, # Manually verified by tester?
"file": "", # The scanner output report file
"tags": "", # User defined tags/labels
"active": false, # Flaw active or historical?
"engagement": "", # Relevant Engagement
"scan_type": "" # Type of Scan. eg. Zap
}

Scan Scheduling

As well as importing previous scan results from security tools; it also currently supports scheduling of port scans using NMAP from within the application itself. You can set up intervals of when to carry out these scans and be notified of the results via email. In the future, DefectDojo will be aiming to allow you to carry out scans using other tools from within the application and enhancing the integration ties between DefectDojo itself and the end security tools.

scan.gif

User Roles

Although a security engineer would primarily use this tool, other users can benefit from the insightful metrics delivered by DefectDojo. Users can be set up with limited access roles so they can only use certain functions inside the applications or view products/projects that have been authorized to them.

This is useful for allowing project managers to get quick oversights on the vulnerabilities affecting their products without the need for superuser permissions.

Jira Integration

DefectDojo also supports integration with Jira. You can create a new webhook in Jira to use this feature. Once configured correctly, you can push findings from DefectDojo into Jira. Also as an added bonus, the integration is bi-directional, so if an issue is closed in Jira, it will also be closed in DefectDojo etc.

Example Workflow

DefectDojo is designed to make tracking defects across products and engagements easy.

  1. The first recommended step in using DefectDojo is to create a Product Type. A Product Type can be used to group Products together.
  2. You can now create a new Product, which could be a project or standalone application.
  3. The next step is to create a new Test Type. These will help you differentiate the scope of your work. For example, you might have a Dependency Check Test Type or a Static Scan Test Type.
  4. Next, it would be a good idea to create new Development Environments. These are useful for tracking deployments of a particular Product.
  5. Once, we have the above items setup, we can add an Engagement. An Engagement captures the findings and details obtained in a certain amount of time. For example, it could list vulnerabilities found from a Nessus scan along with some notes about the assessment.
  6. When scan results are imported as part of an Engagement, you can then begin generating reports for the engagement or view the metrics for the assessment.

Summary

It’s clear to see that DefectDojo does an excellent job of managing vulnerabilities across products and helps get the most out of your application security resources.

The simplified user interface generated reports and various metrics schemes allows non-security engineers to easily look into the findings without having to trawl through the verbose XML and JSON result files from various security tools.

From importing scan results to generating insightful reports within seconds, DefectDojo is a very useful tool that will be a notable time saver when it comes to tackling the chaos that is vulnerability management.

DefectDojo is readily available on GitHub at OWASP/django-DefectDojo.


Take advantage of your Red Hat Developers membership and download RHEL today at no cost.

Share

Integrating PicketLink with OKTA for SAML based SSO

$
0
0

JBoss Application Server ships with PicketLink module for enabling SAML based SSO. PicketLink is an open source module and it is SAML v2.0 complained, for more information about ‘PicketLink’ please visit picketlink.org.

Now the requirement is to enable SAML based SSO in JBoss Application Server where IDP is OKTA.

Before we start enabling this, one should have an OKTA organization, a free developer organization can be created here.

If you already have an OKTA organization, you need to set up a SAML application by following the steps below.

  1.  Login into your OKTA organization and click on “Admin”.
  2. Click on Applications.
  3. Add a new application.
  4. Create a new application.
  5. Keep the Platform as the web and select sign method as SAML 2.0 and click on create.
  6.  Give your application a name and click on next.
  7.  In this section, you need to do your SAML configuration.
  8. Note: Here we are not using any advanced setting, if you want your assertion to be signed and encrypted you can check in the advanced settings.
  9.  Once done, click on finish. For more information, you can refer to OKTA documentation.
  10.  Coming to the part of the PicketLink configuration, you have to be aware of your SP and IDP URL, you can find your IDP url from OKTA by following the steps below.
    • Navigating into application into your newly created application.
    • Navigate to “Sign On” tab and click “View Setup Instruction” and you will find “Identity Provider Single Sign-On URL”.
  11. In the JBoss application server end, you can try with this application, here you just need to change the IDP url in picketlink.xml and use OKTA URL which you received in the previous step, you also need to change the SP url (https://localhost:8443/picketlink-enc/). Make sure that context-root is set as “picketlink-enc” in jboss-web.xml .
  12.  To login into the application, you need to assign users in OKTA for the application you have created.
  13. Now you can get access to your application (https://localhost:8443/picketlink-enc/) authenticating via OKTA.

Click here and quickly get started with the JBoss EAP download.

Share

Stack Clash Mitigation in GCC — Background

$
0
0

It has long been recognized that unconstrained growth of memory usage constitutes a potential denial of service vulnerability. Qualys has shown that such unconstrained growth can be combined with other vulnerabilities and exploited in ways that are more serious.

Typically, the heap and stack of a process start at opposite ends of the unused address space and grow towards each other. This maximizes the flexibility to grow the regions over the course of execution of the program without apriori knowing how much of either resource is needed or even the relationship between their needs.

Heap growth is explicit (via malloc), stack growth is implicit. Stack growth depends on the process accessing an unmapped page in memory. This write causes a segmentation fault (SEGV). The kernel catches the SEGV and either extends the stack, returning control to the application or halts the application if the stack cannot be extended.

Over a decade ago, the concept of a stack guard page was introduced to prevent the heap and stack from colliding. The guard sits at the end of the currently allocated stack. When the kernel tries to extend the stack, it will also move the guard. If the guard cannot be moved (because it would collide with the heap), then the process is terminated.

Guard page protection requires that the process access data on the guard page. That access creates a SEGV that the kernel intercepts to trigger extending the stack and checking the guard page for a collision with the heap.

Qualys has developed exploits by first using memory leaks, large allocas and/or other tricks to bring the stack and heap close together. Then a function with a large static or dynamic stack allocation can be used to “jump the guard”.  “Jumping the guard” occurs by advancing the stack pointer by more than a page without writing into the allocated area. After jumping the guard, the heap and stack have collided. The attacker can then use rites into the stack to change objects or metadata on the heap or vice-versa.

Qualys have implemented multiple proofs of concept exploits using these techniques on Linux and BSD systems. It is almost guaranteed that other systems such as Solaris and some embedded systems are also vulnerable to this attack vector.

Glibc presents the attacker with a particularly inviting target because it is mapped into every running process on a Linux system. It provides the full set of vulnerabilities necessary to mount these attacks. Our initial response is to close down the large/unbound allocations within glibc which Qualys’s proof of concept exploits currently use.

However, this is just a stopgap measure and as we close down one set of vulnerabilities the attackers will just look for other vulnerable points to exploit. Thus, we have been aggressively developing a more comprehensive strategy to eliminate these problems at minimal cost.

In particular, these exploits depend on finding stack allocations, which are larger than a page and which do not immediately access those pages. Those allocations are key to “jumping the guard” and present a choke point for mitigation.

We can arrange for the compiler to “probe” the stack when making large allocations to ensure that there is an access to each page during or immediately after allocation. Thus, the stack guard page will be accessed if there is an attack in progress and the kernel will halt the process.

That’s it for today.  Next is a discussion of why existing probing mechanisms in GCC are generally not sufficient for protecting code from stack-clash style attacks.

Share

The post Stack Clash Mitigation in GCC — Background appeared first on RHD Blog.

New with JBoss EAP 7.1: Credential Store

$
0
0

In previous versions of JBoss EAP, the primary method of securely storing credentials and other sensitive strings was to use a password vault. A password vault stopped you from having to save passwords and other sensitive strings in plain text within the JBoss EAP configuration files.

However, a password vault has a few drawbacks. For example, each JBoss EAP server can only use one password vault, and all management of the password vault has to be done with an external tool.

New with the elytron subsystem in JBoss EAP 7.1 is the credential store feature.

You can create and manage multiple credential stores from right in the JBoss EAP management CLI, and the JBoss EAP management model now natively supports referring to values in a credential store using the credential-reference attribute. You can also create and use credential stores for Java applications using Elytron Client.

Below is a quick demonstration that shows how to create and use a credential store using the JBoss EAP management CLI.

Create a Credential Store

/subsystem=elytron/credential-store=my_store:add(location="cred_stores/my_store.jceks", relative-to=jboss.server.data.dir,  credential-reference={clear-text=supersecretstorepassword},create=true)

Add a Credential or a Sensitive String to a Credential Store

/subsystem=elytron/credential-store=my_store:add-alias(alias=my_db_password, secret-value="speci@l_db_pa$$_01")

Use a Stored Credential in the JBoss EAP Configuration

The below example uses the previously added credential as the password for a new JBoss EAP data source.

data-source add --name=my_DS --jndi-name=java:/my_DS --driver-name=h2 --connection-url=jdbc:h2:mem:test;DB_CLOSE_DELAY=-1;DB_CLOSE_ON_EXIT=FALSE --user-name=db_user --credential-reference={store=my_store, alias=my_db_password}

Using Credential Stores in EJB Applications

EJBs and other clients can use Elytron Client to create, modify, and access credential stores outside of a JBoss EAP server.

For more information on using credential stores in JBoss EAP 7.1, including how to convert existing password vaults to credential stores, see the JBoss EAP 7.1 How to Configure Server Security guide.

Share

The post New with JBoss EAP 7.1: Credential Store appeared first on RHD Blog.

Securing AMQ7 Brokers with SSL (part 2)

$
0
0

Previously I did a post on Securing AMQ7 Routers with SSL. This post will expand upon that and explain how to secure JBoss AMQ7 Brokers with SSL and how to connect the routers and brokers with SSL as well.

SSL Between Brokers

If you have not already gathered your keystore and truststore files from the previous post, you will need to do so following these directions. If you already generated files to use for securing your routers those same files can be used.

 openssl req -newkey rsa:2048 -nodes -keyout key.pem -x509 -days 65000 -out cert.pem
 openssl x509 -text -noout -in cert.pem
 openssl pkcs12 -inkey key.pem -in cert.pem -export -out truststore.p12
 openssl pkcs12 -in truststore.p12 -noout -info

You should end up with the following files:

  • key.pem
  • cert.pem
  • truststore.p12

Now that you have the appropriate files, you will need to edit your broker.xml files to use the certificates. Both acceptors and connectors need to be edited. In this example the files are in my broker/etc folder so I do not need a file path. A path is necessary if you place the files elsewhere.

<acceptors>
   <acceptor name="artemis">tcp://localhost:61616?sslEnabled=true;keyStorePath=truststore.p12;keyStorePassword=password;enabledProtocols=TLSv1,TLSv1.1,TLSv1.2;trustStorePath=truststore.p12;trustStorePassword=password</acceptor>
</acceptors>
<connectors>
   <connector name="my-connector">tcp://localhost:61616?sslEnabled=true;keyStorePath=truststore.p12;keyStorePassword=password;enabledProtocols=TLSv1,TLSv1.1,TLSv1.2;trustStorePath=truststore.p12;trustStorePassword=password</connector>
</connectors>

If you start up 2 brokers now with the sslEnabled you can see the traffic between them is secure.

SSL Between Brokers and Routers

In the previous post we setup an sslProfile in the router configuration.  This will be used again here.  If you have not previously added it, do so now.

sslProfile {
   name: router-ssl
   certFile: /absolute/path/to/cert.pem
   keyFile:/absolute/path/to/key.pem
   password: password
}

Next you will adjust the connector for the broker in the router configuration to use this ssl profile.

connector {
   name: broker1
   host: localhost
   port: 61616
   role: route-container
   saslMechanisms: ANONYMOUS
   sslProfile: router-ssl
   verifyHostName: no
}

After this step everything going in and out of the brokers is secure with SSL.  Happy testing!


Take advantage of your Red Hat Developers membership and download RHEL today at no cost.


Join the Red Hat Developer Program (it’s free) and get access to related cheat sheets, books, and product downloads.

Share

The post Securing AMQ7 Brokers with SSL (part 2) appeared first on RHD Blog.

Red Hat Summit 2018 to focus on Modern App Development

$
0
0

On behalf of the selection teams for Modern Application Development, I am pleased to share this exciting, dynamic, and diverse set of developer-related breakouts, workshops, BoFs, and labs for Red Hat Summit 2018.

With these 61+ sessions listed below, we believe that every attending application developer will come away with a strong understanding of where Red Hat is headed in this app dev space, and obtain a good foundation for tackling that next generation of apps. Encompassing various aspects of Modern App Dev, some sub-topics we’ve focused on are around microservices, service mesh, security and AI/ML, plus there is a large collection of complementary and related topics.

So…if you’re an application developer, we invite you to attend Red Hat Summit 2018 and experience the code first hand. There’s something for everyone and definitely something for you. Register today.

Great talks don’t happen without great speakers, and we feel really privileged to have these popular, high-in-demand speakers:

  • Brad Micklea
  • Burr Sutter
  • Christian Posta
  • Clement Escoffier
  • Edson Yanaga
  • Kirsten Newcomer
  • Langdon White
  • Rafael Benevides
  • Scott McCarty
  • Siamak Sadeghianfar
  • Steven Pousty
  • Todd Mancini
  • Plus speakers from: AquaSec, Bell Canada, Black Duck, Capital One, Deutsche Bank, Google, Microsoft, MITRE Corp., nearForm, Sonatype, Twistlock, and dozens more.


A great list of talks:

Service Mesh, Serverless, Istio, FaaS, OpenWhisk…

  1. 10 trends reshaping the developer experience
  2. Containers, microservices, serverless: On being serverless or serverful
  3. Functions-as-a-Service with OpenWhisk and Red Hat OpenShift
  4. Hands on with Istio on OpenShift
  5. Istio and service mesh management—an overview and roadmap
  6. Istio: Solving challenges of hybrid cloud
  7. Low-risk mono to microservices: Istio, Teiid, and Spring Boot
  8. Move your Spring NetFlix OSS app to Istio service mesh
  9. OpenShift service mesh on multi-cloud environments

Cloud, containers, microservices…

  1. 5 minutes to enterprise node.js on Red Hat OpenShift with Red Hat OpenShift Application Runtimes
  2. 5 ways Red Hat OpenShift enhances application development
  3. A Java developer’s journey to Kubernetes and OpenShift
  4. Building production-ready containers
  5. BYOD and build cloud-native apps
  6. Cloud-native smackdown V
  7. Containerizing applications—existing and new
  8. Customer-driven development: How we built Red Hat Ansible Automation
  9. Developing .NET Core applications on Red Hat OpenShift
  10. Eclipse Che for developer teams on Red Hat OpenShift
  11. Eclipse MicroProfile with WildFly Swarm
  12. EE4J, MicroProfile, and the future of enterprise Java
  13. Getting started with cloud-native apps
  14. Grafeas to gate your deployment pipeline
  15. Holy Canoli. How am I supposed to test all this?
  16. Introducing OpenShift.io—end-to-end cloud-native development made easy
  17. Java development with JBoss Fuse on OpenShift
  18. Microservices data patterns: CQRS & event sourcing
  19. Migrating your existing applications to Node.js on OpenShift
  20. Mobile in a containers world
  21. OpenShift and Tensorflow
  22. OpenShift Roadmap: You won’t believe what’s next!
  23. Orchestrating Microsoft Windows containers with Red Hat OpenShift
  24. SOLID principles for cloud-native applications
  25. The future of OpenShift.io
  26. The power of cloud workspaces and the future of our IDEs
  27. The why behind DevOps, containers, and microservices
  28. Upgrade your developer powers with Kubernetes and OpenShift
  29. Why you’re going to FAIL running Java on docker

AI and Machine Learning…

  1. Adding intelligence to event-processing apps
  2. AI and ML make processor architecture important again
  3. Machine learning essentials for developers
  4. Using machine learning, Red Hat JBoss BPM Suite, and reactive microservices

Secure Programming…

  1. Best practices for securing the container life cycle
  2. DevSecOps with disconnected Red Hat OpenShift
  3. I’m a developer. What do I need to know about security?
  4. Securing apps and services with Red Hat single sign-on
  5. Securing service mesh, microservices, and modern applications with JSON Web Token (JWT)
  6. Shift security left—and right—in the container life cycle

More important app dev stuff…

  1. Be reactive with Red Hat OpenShift Application Runtimes
  2. Business automation solutions for financial services
  3. Collaborative API development with Apicurio and open API specifications
  4. Intelligent applications on OpenShift from prototype to production
  5. Introducing Red Hat Fuse 7
  6. iPaaS hackathon: Build a cool integrated app
  7. iPaaS: Integration for non-techies—a demonstration
  8. jBPM BoF: Let’s talk processes
  9. Making legacy new again—a migration story
  10. Red Hat Business Automation primer: Vision and roadmap
  11. Red Hat JBoss AMQ Online—Messaging-as-a-Service
  12. Red Hat JBoss Enterprise Application Platform roadmap
  13. Slay the monolith: Our journey to federate case with jBPM

Power Training

  1. Containerizing applications with Red Hat OpenShift
  2. Implementing microservices architectures with Java EE


Definition: Modern Application Development

Modern application development is the rapid creation, maintenance, and management of applications that can run across complex hybrid cloud environments without modification. This approach lets organizations get the most from innovative technologies like containers and microservices and game-changing practices like agile, DevOps, and continuous integration and deployment (CI/CD).

Share

The post Red Hat Summit 2018 to focus on Modern App Development appeared first on RHD Blog.


3Scale by Red Hat Integration with ForgeRock using OpenID Connect

$
0
0

In my last article, I wrote about how API Management and Identity Management can work together in a complementary fashion to secure and manage the services/endpoints which applications expose as APIs. In that article I covered how Red Hat 3scale API Management can be used to integrate an identity manager, in addition to providing API management functions such as rate limiting and throttling.

This article will show how to integrate ForgeRock with 3scale by Red Hat. ForgeRock is one of the popular and growing identity management companies. ForgeRock helps organizations interact securely with customers, employees, devices, and things.

For this tutorial, the following installers are used:

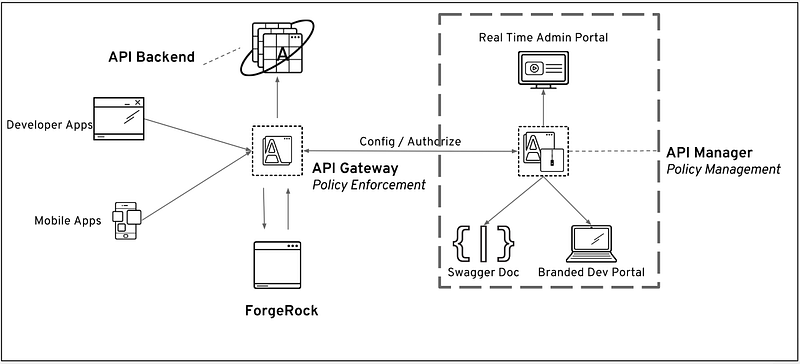
Below are the components:


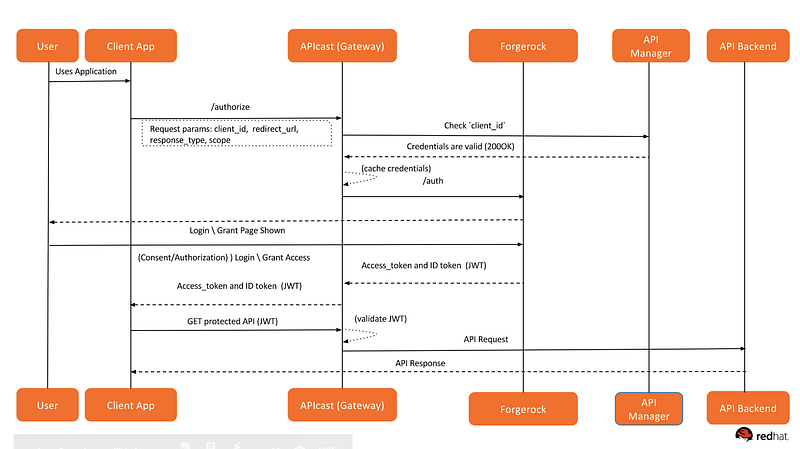
Workflow

  1. Client App sends requests to APIcast API gateway with desired request parameters.
  2. APIcast verifies the credentials with API Manager, and stores in cache if valid.
  3. APIcast sends the request to ForgeRock, where it authenticates the user and obtains end user consent/authorization.
  4. ForgeRock sends the End-User back to the Client with an id_token, and if requested, an access_token.
  5. For every API call, the JWT token is sent via APIcast to API backend where it verifies the incoming JWT with the ForgeRock public key. If valid, then proxy the call to the API backend.
  6. The backend API extracts the JWT, verifies the scope for the user, and sends back an API response to the client application.

Sequence Diagram


To complete the end-to-end integration we should set up all pieces one by one. Below are the components and the instructions.

Setting up API backend

For this demo, I will be using the echo API service hosted by 3scale by Red Hat. You can always write a service that will extract the JWT, parse the JSON payload, extract the user profile, and send back the product subscription status for that user.

Setting up API Manager

  1. Login to 3scale by Red Hat admin portal.
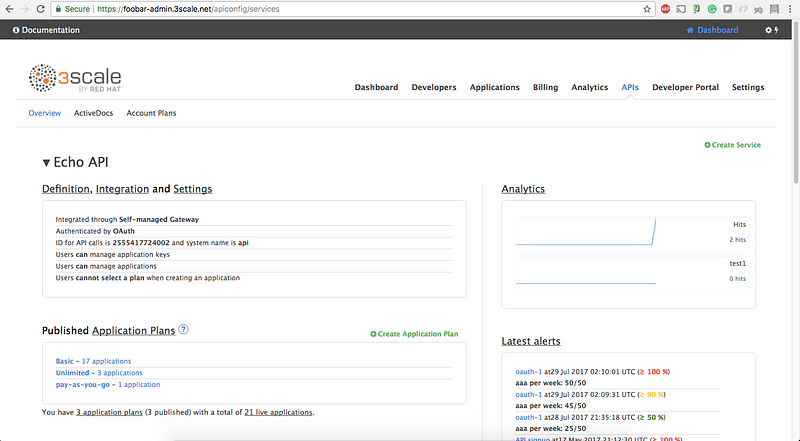
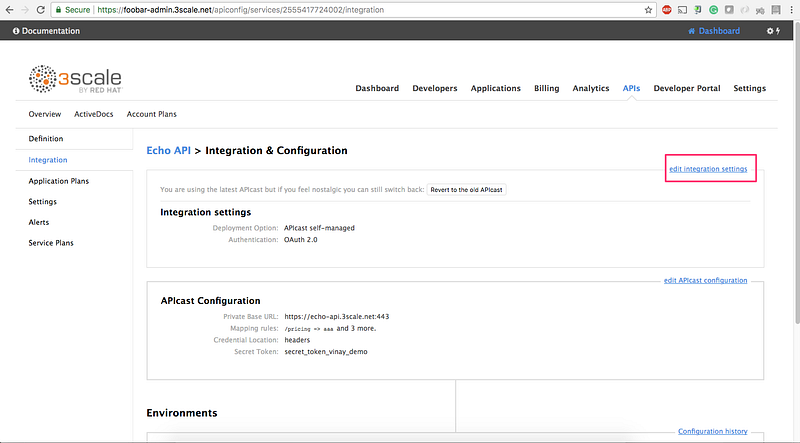
  2. Select the service that you want to use to enable OpenId Connect integration with ForgeRock. Click on the APIs tab, select the Service, and click on the Integration link. We are using the default Echo API:


3. Click on edit integration settings:


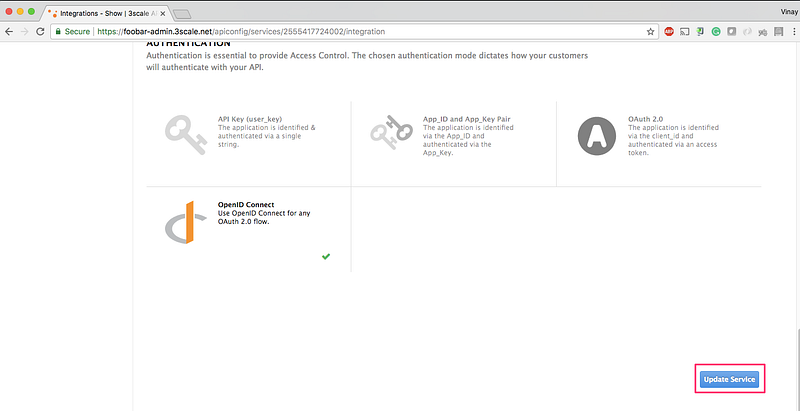
4. Select OpenID Connect and click on Update Service:


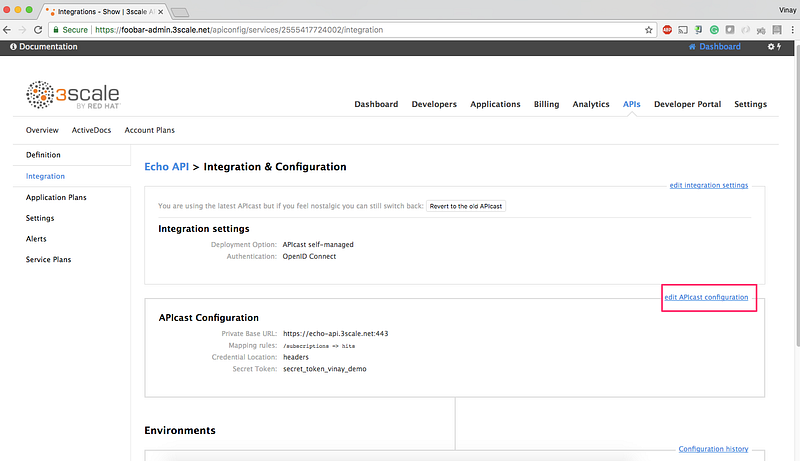
5. Go back to the integration page, and click on edit APIcast configuration:


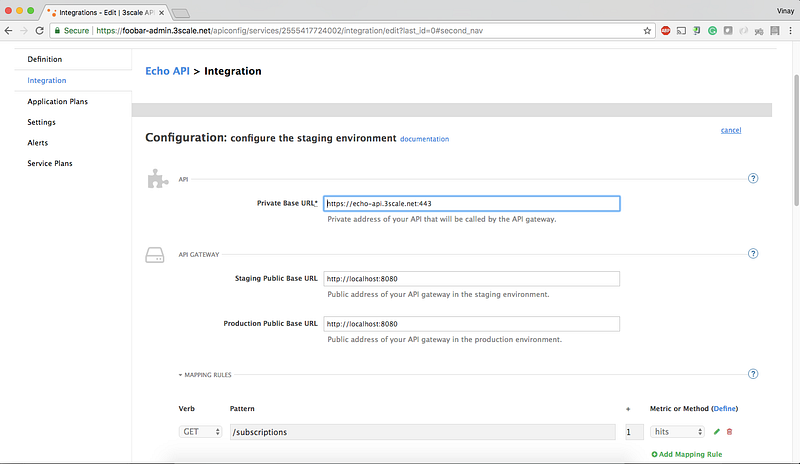
6. Enter the Staging and Production base URL. We will deploy the APIcast gateway locally on docker, so name it as http://localhost:8080:


7. Finally, click on Update Staging Environment. You can also promote it to Production (optional).

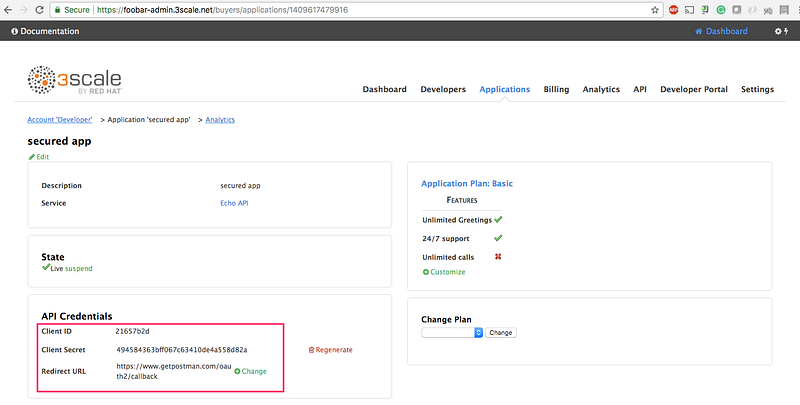
8. Create an application and get the client_id and client_secret .

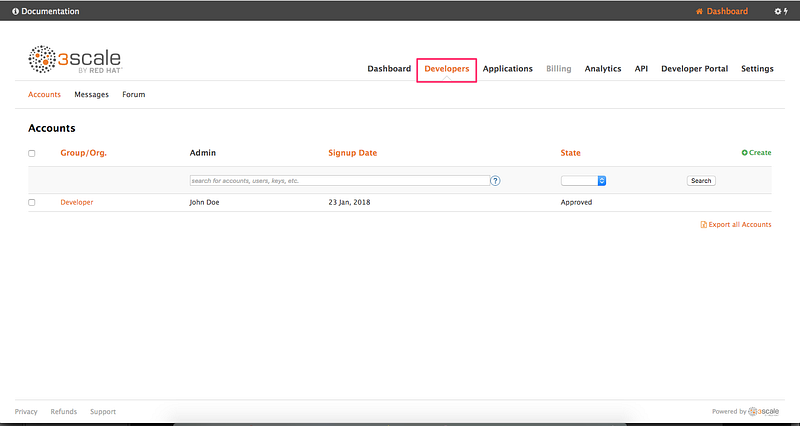
8.1 Go to the Developers tab and click on Developers:


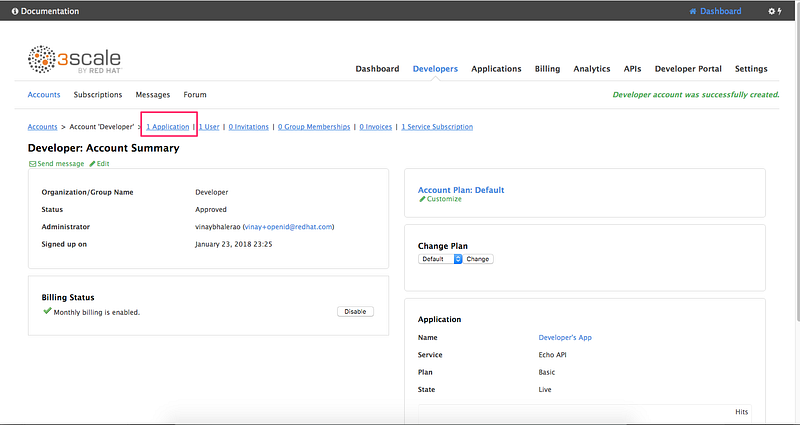
8.2 Click on Application:


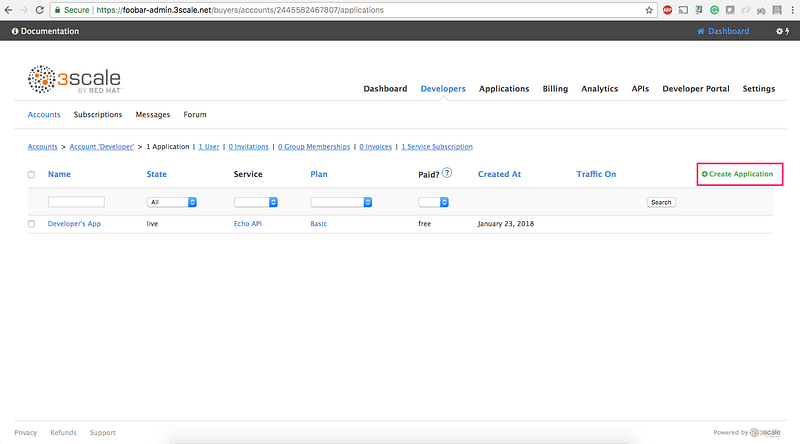
8.3 Click on Create Application link:


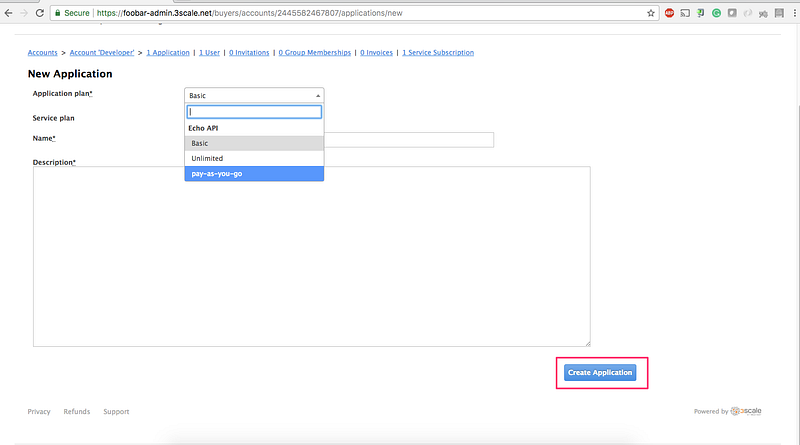
8.4 Select the Application Plan for the service and then click on Create Application:


8.5 Note down the client_id and client_secret .  We will use the Postman to test our integration so we will fill in the callback information with a fixed link. Type in `https://www.getpostman.com/oauth2/callback`. in the Redirect URL field. Click on the Update button.


That’s all!
Now let’s move toward the ForgeRock setup.

Setting up ForgeRock

Installation of ForgeRock is outside the scope of this tutorial. Please refer ForgeRock documentation for installation. After installing ForgeRock, make sure you are able to access the URL on http://openam.mydomain.com:8080/openam.

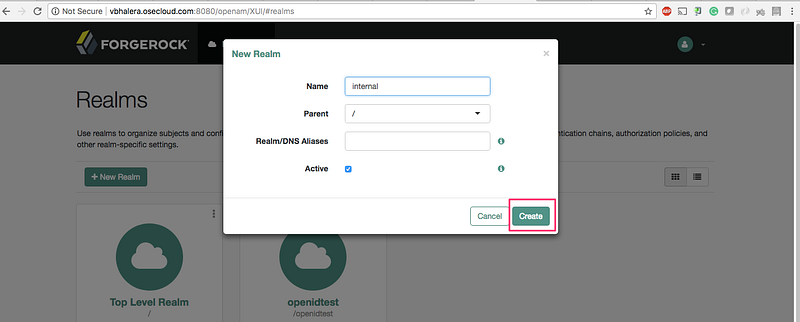
  1. Create Realm:


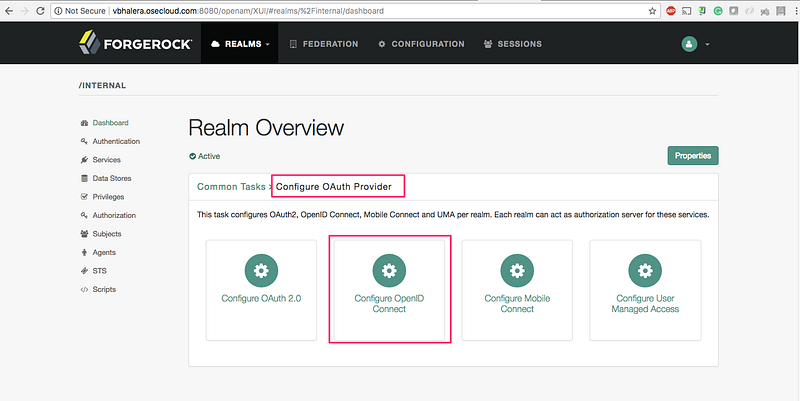
2. Click on Configure Oauth Provider → Configure OpenID Connect:


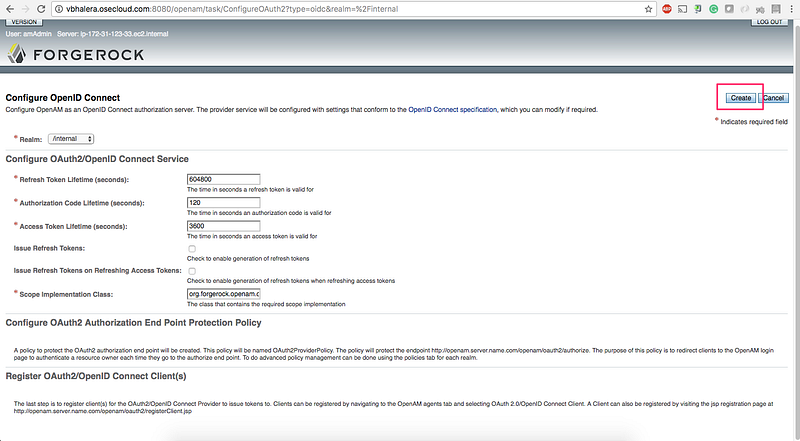
3. Click on Create:


4. Creating (or syncing) the 3scale by Red Hat client_id with ForgeRock.

Our lead developer, Michal Cichra, wrote a tool called Zync to synchronize all 3scale by Red Hat client_ids to IDP. So every time when an application is created (i.e client_id and client_secret  on 3scale by Red Hat), the same is automatically created on the IDP side. For this exercise, I have manually created the client_ids using the below registration. If you prefer to create the ids runtime, edit the tool with the client registration endpoint of ForgeRock. PRs are welcome.


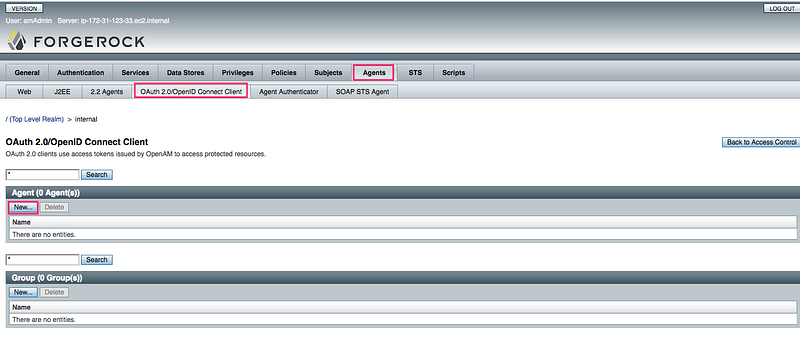
4.1 Click on Agents → Oauth2.0/OpenID Connect Client → New:


4.2 Copy the 3scale by Red Hat client_id and client_secret from the admin portal that you created earlier. Enter Name as client_id and Password as client_secret. Click Create:

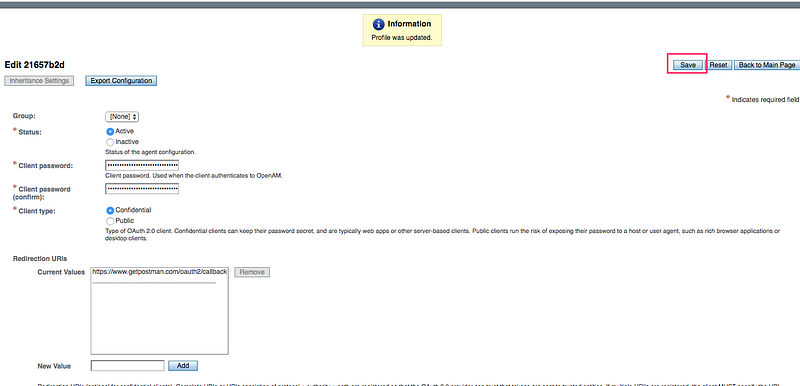
4.3 Enter Redirection URIs → https://www.getpostman.com/oauth2/callback and Scope → openid. Click Save:


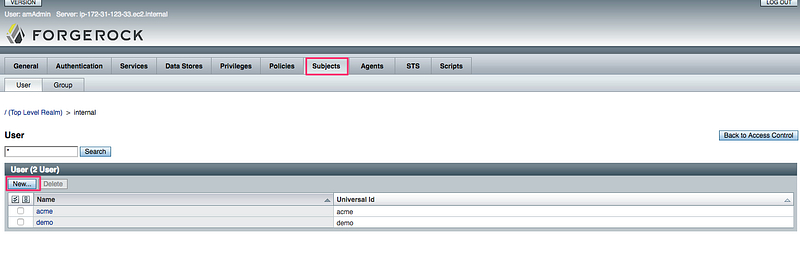
5. Creating an End user that will Authenticate against the IDP.

5.1 Goto Realms → Subjects. Click on New:


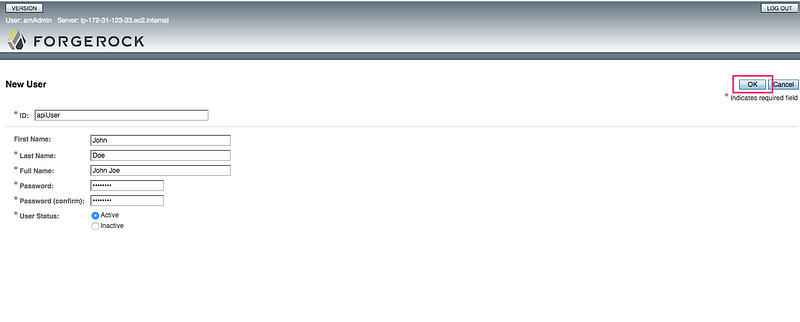
5.2 Enter `ID: apiUser` and `password: 12345678`:


All set for ForgeRock!

Setting up APIcast API gateway

Make sure to install docker and docker-compose before executing the next commands. We will be running APIcast API gateway locally and it will accept all incoming requests from the client.

1. git clone git@github.com:VinayBhalerao/3scale-forgerock-integration.git
2. Edit the .env file per your setup
3. docker-compose up

Send Request to APIcast

  1. Send Authorize request to APIcast
GET http://localhost:8080/authorize?client_id=21657b2d&scope=openid&response_type=token id_token&nonce=1234&redirect_uri=https://www.getpostman.com/oauth2/callback&realm=internal
where,
client_id = 3scale client id
scope = openid
response_type = token id_token
nonce = 1234
redirect_uri = https://www.getpostman.com/oauth2/callback
realm = internal


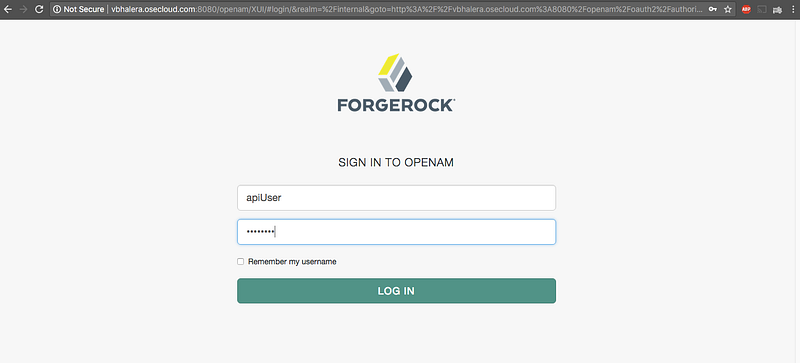
2. A login page is shown from Forgerock. Enter the credentials that we created earlier for End User:

Enter credentials as: apiUser / 12345678 :


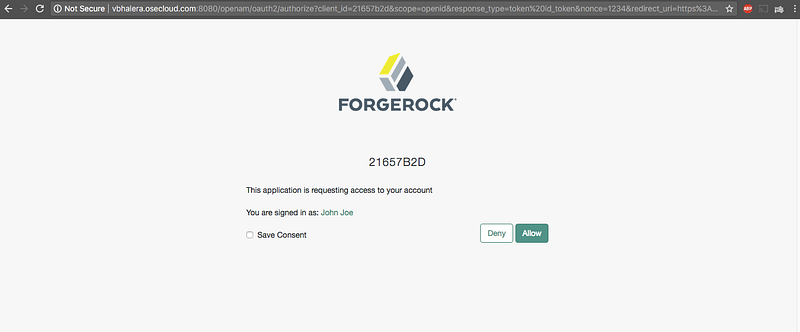
Click on Allow:


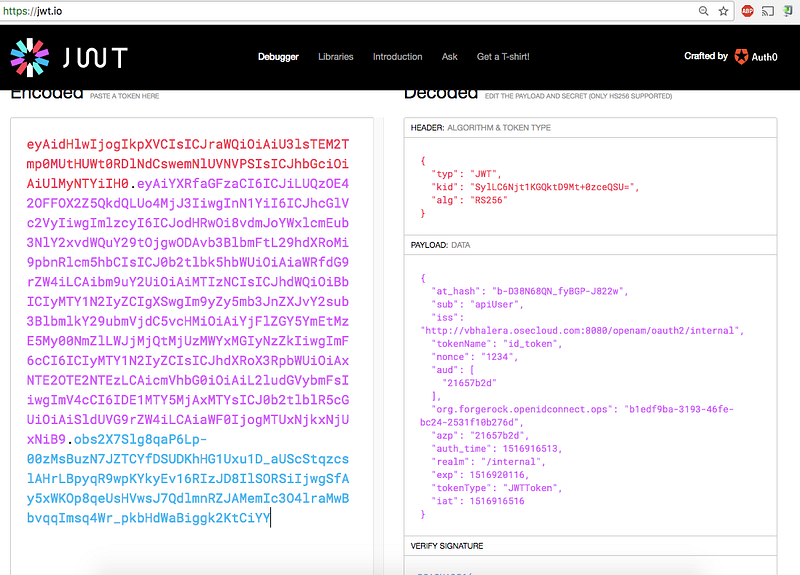
An access_token and id_tokenis redirected back to the application. The id_token is the JWT token generated by the IDP.

Paste the token on JWT.io website to decrypt the contents (optional):


The above token is sent to the APIcast gateway for every call. The gateway will verify the signature of JWT using the public key. If valid, the call is proxied to the API backend along with the JWT. It’s then the backend responsibility to base64 decode the JWT, extract the user profile from JSON payload, and then (depending on the profile) send back the API response. [Refer How microservices verify a JWT for in-depth details]

Request and Response from APIcast:

curl -H "Authorization: Bearer eyAidHlwIjogIkpXVCIsICJraWQiOiAiU3lsTEM2Tmp0MUtHUWt0RDlNdCswemNlUVNVPSIsICJhbGciOiAiUlMyNTYiIH0.eyAiYXRfaGFzaCI6ICJUcUd5c2dRZURsWDhIOFNHR1FjcEF3IiwgInN1YiI6ICJhcGlVc2VyIiwgImlzcyI6ICJodHRwOi8vdmJoYWxlcmEub3NlY2xvdWQuY29tOjgwODAvb3BlbmFtL29hdXRoMi9pbnRlcm5hbCIsICJ0b2tlbk5hbWUiOiAiaWRfdG9rZW4iLCAibm9uY2UiOiAiMTIzNCIsICJhdWQiOiBbICIyMTY1N2IyZCIgXSwgIm9yZy5mb3JnZXJvY2sub3BlbmlkY29ubmVjdC5vcHMiOiAiNjk2YmRlNTYtZmNiZi00ZTFkLWIzOGItYmMzNzQ4OGVhODRiIiwgImF6cCI6ICIyMTY1N2IyZCIsICJhdXRoX3RpbWUiOiAxNTE2OTE3NTQwLCAicmVhbG0iOiAiL2ludGVybmFsIiwgImV4cCI6IDE1MTY5MjEyMzUsICJ0b2tlblR5cGUiOiAiSldUVG9rZW4iLCAiaWF0IjogMTUxNjkxNzYzNSB9.SuYI1tP5uJ94y8XRc6QQClXlmuLzMFEcE1LlW_31GafXv91jg3QwbRI-1RV1XOISfWnLW7l-1eGyKZtK_P8nroLjXYs2c-HrIgTwK16FBTcM9-Gt_jzbntwN4hiLD4PbhVb562fTkdqQCA4ZlNR9QOmQUE0ZKlMSwB3b0bNSmys" http://localhost:8080/subscriptions -v
*   Trying ::1...
* Connected to localhost (::1) port 8080 (#0)
> GET /subscriptions HTTP/1.1
> Host: localhost:8080
> User-Agent: curl/7.43.0
> Accept: */*
> Authorization: Bearer eyAidHlwIjogIkpXVCIsICJraWQiOiAiU3lsTEM2Tmp0MUtHUWt0RDlNdCswemNlUVNVPSIsICJhbGciOiAiUlMyNTYiIH0.eyAiYXRfaGFzaCI6ICJUcUd5c2dRZURsWDhIOFNHR1FjcEF3IiwgInN1YiI6ICJhcGlVc2VyIiwgImlzcyI6ICJodHRwOi8vdmJoYWxlcmEub3NlY2xvdWQuY29tOjgwODAvb3BlbmFtL29hdXRoMi9pbnRlcm5hbCIsICJ0b2tlbk5hbWUiOiAiaWRfdG9rZW4iLCAibm9uY2UiOiAiMTIzNCIsICJhdWQiOiBbICIyMTY1N2IyZCIgXSwgIm9yZy5mb3JnZXJvY2sub3BlbmlkY29ubmVjdC5vcHMiOiAiNjk2YmRlNTYtZmNiZi00ZTFkLWIzOGItYmMzNzQ4OGVhODRiIiwgImF6cCI6ICIyMTY1N2IyZCIsICJhdXRoX3RpbWUiOiAxNTE2OTE3NTQwLCAicmVhbG0iOiAiL2ludGVybmFsIiwgImV4cCI6IDE1MTY5MjEyMzUsICJ0b2tlblR5cGUiOiAiSldUVG9rZW4iLCAiaWF0IjogMTUxNjkxNzYzNSB9.SuYI1tP5uJ94y8XRc6QQClXlmuLzMFEcE1LlW_31GafXv91jg3QwbRI-1RV1XOISfWnLW7l-1eGyKZtK_P8nroLjXYs2c-HrIgTwK16FBTcM9-Gt_jzbntwN4hiLD4PbhVb562fTkdqQCA4ZlNR9QOmQUE0ZKlMSwB3b0bNSmys
>
< HTTP/1.1 200 OK
< Server: openresty/1.11.2.2
< Date: Thu, 25 Jan 2018 22:03:31 GMT
< Content-Type: application/json
< Content-Length: 1480
< Connection: keep-alive
< Cache-control: private
< Set-Cookie: d8c1dd0e39ac4456ed39ce5889b9a5a5=e3380f4380dfce29d71b1a31cd3dd973; path=/; HttpOnly
< Vary: Origin
< X-Content-Type-Options: nosniff
<
{
  "method": "GET",
  "path": "/subscriptions",
  "args": "",
  "body": "",
  "headers": {
    "HTTP_VERSION": "HTTP/1.1",
    "HTTP_HOST": "echo-api.3scale.net",
    "HTTP_ACCEPT": "*/*",
    "HTTP_AUTHORIZATION": "Bearer eyAidHlwIjogIkpXVCIsICJraWQiOiAiU3lsTEM2Tmp0MUtHUWt0RDlNdCswemNlUVNVPSIsICJhbGciOiAiUlMyNTYiIH0.eyAiYXRfaGFzaCI6ICJUcUd5c2dRZURsWDhIOFNHR1FjcEF3IiwgInN1YiI6ICJhcGlVc2VyIiwgImlzcyI6ICJodHRwOi8vdmJoYWxlcmEub3NlY2xvdWQuY29tOjgwODAvb3BlbmFtL29hdXRoMi9pbnRlcm5hbCIsICJ0b2tlbk5hbWUiOiAiaWRfdG9rZW4iLCAibm9uY2UiOiAiMTIzNCIsICJhdWQiOiBbICIyMTY1N2IyZCIgXSwgIm9yZy5mb3JnZXJvY2sub3BlbmlkY29ubmVjdC5vcHMiOiAiNjk2YmRlNTYtZmNiZi00ZTFkLWIzOGItYmMzNzQ4OGVhODRiIiwgImF6cCI6ICIyMTY1N2IyZCIsICJhdXRoX3RpbWUiOiAxNTE2OTE3NTQwLCAicmVhbG0iOiAiL2ludGVybmFsIiwgImV4cCI6IDE1MTY5MjEyMzUsICJ0b2tlblR5cGUiOiAiSldUVG9rZW4iLCAiaWF0IjogMTUxNjkxNzYzNSB9.SuYI1tP5uJ94y8XRc6QQClXlmuLzMFEcE1LlW_31GafXv91jg3QwbRI-1RV1XOISfWnLW7l-1eGyKZtK_P8nroLjXYs2c-HrIgTwK16FBTcM9-Gt_jzbntwN4hiLD4PbhVb562fTkdqQCA4ZlNR9QOmQUE0ZKlMSwB3b0bNSmys",
    "HTTP_USER_AGENT": "curl/7.43.0",
    "HTTP_X_3SCALE_PROXY_SECRET_TOKEN": "secret_token_vinay_demo",
    "HTTP_X_REAL_IP": "172.21.0.1",
    "HTTP_X_FORWARDED_FOR": "76.102.119.200, 10.0.103.186",
    "HTTP_X_FORWARDED_HOST": "echo-api.3scale.net",
    "HTTP_X_FORWARDED_PORT": "443",
    "HTTP_X_FORWARDED_PROTO": "https",
    "HTTP_FORWARDED": "for=10.0.103.186;host=echo-api.3scale.net;proto=https"
  },
  "uuid": "4b100977-4b31-4dc7-9b45-bf5dadb50d97"
* Connection #0 to host localhost left intact

Thanks for taking the time and reading this tutorial. In my next blog post, I will cover how to integrate 3scale by Red Hat with PingFederate using OpenID Connect.

Share

The post 3Scale by Red Hat Integration with ForgeRock using OpenID Connect appeared first on RHD Blog.

Recommended compiler and linker flags for GCC

$
0
0

Did you know that when you compile your C or C++ programs, GCC will not enable all exceptions by default?  Do you know which build flags you need to specify in order to obtain the same level of security hardening that GNU/Linux distributions use (such as Red Hat Enterprise Linux and Fedora)? This article walks through a list of recommended build flags.

The GNU-based toolchain in Red Hat Enterprise Linux and Fedora (consisting of GCC programs such as gcc, g++, and Binutils programs such as as and ld)  are very close to upstream defaults in terms of build flags. For historical reasons, the GCC and Binutils upstream projects do not enable optimization or any security hardening by default. While some aspects of the default settings can be changed when building GCC and Binutils from source, the toolchain we supply in our RPM builds does not do this. We only align the architecture selection to the minimum architecture level required by the distribution.

Consequently, developers need to pay attention to build flags, and manage them according to the needs of their project for optimization, level of warning and error detection, and security hardening.

During the build process to create distributions such as Fedora and Red Hat Enterprise Linux, compiler and linker flags have to be injected, as discussed below. When you are using one of these distributions with the included compiler, this environment is recreated, requiring an extensive list of flags to be specified. Recommended flags vary between distribution versions because of toolchain and kernel limitations. The following table lists recommended build flags (as seen by the gcc and g++ compiler drivers), along with a brief description of which version of Red Hat Enterprise Linux and Fedora are applicable:

Flag Purpose Applicable Red Hat Enterprise Linux versions Applicable Fedora versions
-D_FORTIFY_SOURCE=2 Run-time buffer overflow detection All All
-D_GLIBCXX_ASSERTIONS Run-time bounds checking for C++ strings and containers All (but ineffective without DTS 6 or later) All
-fasynchronous-unwind-tables Increased reliability of backtraces All (for aarch64, i386, s390, s390x, x86_64) All (for aarch64, i386, s390x, x86_64)
-fexceptions Enable table-based thread cancellation All All
-fpie -Wl,-pie Full ASLR for executables 7 and later (for executables) All (for executables)
-fpic -shared No text relocations for shared libraries All (for shared libraries) All (for shared libraries)
-fplugin=annobin Generate data for hardening quality control Future Fedora 28 and later
-fstack-clash-protection Increased reliability of stack overflow detection Future (after 7.5) 27 and later (except armhfp)
-fstack-protector or -fstack-protector-all Stack smashing protector 6 only n/a
-fstack-protector-strong Likewise 7 and later All
-g Generate debugging information All All
-grecord-gcc-switches Store compiler flags in debugging information All All
-mcet -fcf-protection Control flow integrity protection Future 28 and later (x86 only)
-O2 Recommended optimizations All All
-pipe Avoid temporary files, speeding up builds All All
-Wall Recommended compiler warnings All All
-Werror=format-security Reject potentially unsafe format string arguents All All
-Werror=implicit-function-declaration Reject missing function prototypes All (C only) All (C only)
-Wl,-z,defs Detect and reject underlinking All All
-Wl,-z,now Disable lazy binding 7 and later All
-Wl,-z,relro Read-only segments after relocation 6 and later All

This table does not list flags for managing an executable stack or the .bss section, under the assumption that these historic features have been phased out by now.

Documentation for compiler flags is available in the GCC manual. Those flags (which start with -Wl) are passed to the linker and are described in the documentation for ld.

For some flags, additional explanations are in order:

  • -D_GLIBCXX_ASSERTIONS enables additional C++ standard library hardening. It is implemented in libstdc++ and described in the libstdc++ documentation. Unlike the C++ containers with full debugging support, its use does not result in ABI changes.
  • -fasynchronous-unwind-tables is required for many debugging and performance tools to work on most architectures (armhfp, ppc, ppc64, ppc64le do not need these tables due to architectural differences in stack management). Even though it is necessary on aarch64, upstream GCC does not enable it by default. The compilers for Red Hat Enterprise Linux and Fedora carry a patch to enable it by default.
  • -fexceptions is recommended for hardening of multi-threaded C and C++ code. Without it, the implementation of thread cancellation handlers (introduced by pthread_cleanup_push) uses a completely unprotected function pointer on the stack. This function pointer can simplify the exploitation of stack-based buffer overflows even if the thread in question is never canceled.
  • -fstack-clash-protection prevents attacks based on an overlapping heap and stack. This is a new compiler flag in GCC 8, which has been backported to the system compiler in Red Hat Enterprise Linux 7.5 and Fedora 26 (and later versions of both). We expect this compiler feature to reach maturity in Red Hat Enterprise Linux 7.6. The GCC implementation of this flag comes in two flavors: generic and architecture-specific. The generic version shares many of its problems with the older -fstack-check flag (which is not recommended for use). For the architectures supported by Red Hat Enterprise Linux, improved architecture-specific versions are available. This includes aarch64, for which only problematic generic support is available in upstream GCC (as of mid-February 2018). The Fedora armhfp architecture also lacks upstream and downstream support, so the flag cannot be used there.
  • -fstack-protector-strong completely supersedes the earlier stack protector options. It only instruments functions that have addressable local variables or use alloca. Other functions cannot be subject to direct stack buffer overflows and are not instrumented. This greatly reduces the performance and code size impact of the stack protector.
  • To enable address space layout randomization (ASLR) for the main program (executable), -fpie -Wl,-pie has to be used. However, while the code produced this way is position-independent, it uses some relocations which cannot be used in shared libraries (dynamic shared objects). For those, use -fpic, and link with -shared (to avoid text relocations on architectures which support position-dependent shared libraries). Dynamic shared objects are always position-independent and therefore support ASLR. Furthermore, the kernel in Red Hat Enterprise Linux 6 uses an unfortunate address space layout for PIE binaries under certain circumstances (bug 1410097) which can severely interfere with debugging (among other things). This is why it is not recommended to build PIE binaries on Red Hat Enterprise Linux 6.
  • -fplugin=annobin enables the annobin compiler plugin, which captures additional metadata to allow a determination of which compiler flags were used during the build. Annobin is currently available only on Fedora, and it is automatically enabled as part of the Fedora 28 build flags , where it shows up as -specs=/usr/lib/rpm/redhat/redhat-annobin-cc1.
  • To generate debugging information we recommend (using -g), even for optimized production builds. Having only partly usable debugging information (due to optimization) certainly beats having none at all. With GCC, generating debugging information does not alter code generation. It is possible to use tools such as eu-strip to separate debugging information before distributing binaries (which automatically happens during RPM builds).
  • -grecord-gcc-switches captures compiler flags, which can be useful to determine whether the intended compiler flags are used throughout the build.
  • -mcet -fcf-protection enables support for the Control-Flow Enforcement Technology (CET) feature in future Intel CPUs. This involves the generation of additional NOPs, which are ignored by the current CPUs. It is recommended that you enable this flag now, to detect any issues caused by them (e.g., interactions with dynamic instrumentation frameworks, or performance issues).
  • For many applications, -O2 is a good choice because the additional inlining and loop unrolling introduced by -O3 increases the instruction cache footprint, which ends up reducing performance. -O2 or higher is also required by -D_FORTIFY_SOURCE=2.
  • By default, GCC allows code to call undeclared functions, treating them as returning int. -Werror=implicit-function-declaration turns such calls into errors. This avoids difficult-to-track-down run-time errors because the default int return type is not compatible with bool or pointers on many platforns. For C++, this option is not needed because the C++ compiler rejects calls to undeclared functions.
  • -Wl,-z,defs is required to detect underlinking, which is a phenomenon caused by missing shared library arguments when invoking the linked editor to produce another shared library. This produces a shared library with incomplete ELF dependency information (in the form of missing DT_NEEDED tags), and the resulting shared object may not be forward compatible with future versions of libraries which use symbol versioning (such as glibc), because symbol versioning information is missing from it.
  • -Wl,-z,now (also referred to as BIND_NOW) is not recommended for use on Red Hat Enterprise Linux 6 because the dynamic linker processes non-lazy relocations in the wrong order (bug 1398716), causing IFUNC resolvers to fail. IFUNC resolver interactions remain an open issue even for later versions, but -Wl,-z,defs will catch the problematic cases involving underlinking.

In RPM builds, some of these flags are injected using -specs=/usr/lib/rpm/redhat/redhat-hardened-cc1 and -specs=/usr/lib/rpm/redhat/redhat-hardened-ld because the option selection mechanism in GCC specs allows one to automatically drop the PIE-related flags (for static linking) for PIC builds (for dynamic linking). For historic reasons, -Wl,-z,now is included in -specs=/usr/lib/rpm/redhat/redhat-hardened-ld, and not on the command line, so it will not show up directly in build logs.

Injecting flags during RPM builds

RPM spec files need to inject build flags in the %build section, as part of the invocation of the build tools.

The most recent versions of the redhat-rpm-config package documents how to obtain the distribution compiler and linker flags. Note that the link goes to the most recent version of the Fedora package. For older distributions, only the following methods for obtaining flags are supported:

  • The %{configure} RPM macro, which runs ./configure, but also sets the CFLAGS and LDFLAGS macros.
  • The %{optflags} RPM macro and the $RPM_OPT_FLAGS environment variable, which provide compiler flags for C and C++ compilers.
  • The $RPM_LD_FLAGS environment variable, which provides linker flags.

Note that Red Hat Enterprise Linux 7 and earlier do not enable fully hardened builds for all packages, and it is necessary to specify:

%global _hardened_build 1
in the RPM spec file to enable the full set of hardening flags. The optional hardening comprises ASLR for executables (PIE) and non-lazy binding/BIND_NOW. For technical reasons, the recommended linker flag -Wl,-z,defs is not used either.

Other flags to consider

  • -fwrapv tells the compiler that the application assumes that signed integer overflow has the usual modulo behavior (like it has in Java, for example). By default, integer overflow is treated as undefined, which helps with certain loop optimizations. This can cause problems with legacy code which assume the Java behavior even for C/C++.
  • -fno-strict-aliasing instructs the compiler to make fewer assumptions about how pointers are used and which pointers can point to the same data (aliasing). This can be required to compile legacy code.
  • -flto and various other flags can be used to switch on link-time optimization (LTO). This can result in improved performance and smaller code, but may interfere with debugging. It may also reveal conformance issues in the source code that were previously hidden by separate compilations.
  • In some cases, -Os (optimize for small code) may result in faster code than -O2 due to reduced instruction cache pressure.
  • For some applications -O3 or -O2 -free-loop-vectorize will provide a significant speed boost. By default, GCC does not perform loop vectorization. Be aware that -O3 will change the way code reacts to ELF symbol interposition, so this option is not entirely ABI-compatible. Overall, we still consider -O2 the choice for the default.
  • -mstackrealign may be needed for compatibility with legacy applications (particularly on i686) which does not preserve stack alignment before calling library functions compiled with recent GCC versions.

Problematic flags

Some flags are used fairly often, but cause problems. Here is a list of a few of those:

  • -ffast-math can have very surprising consequences because many identities which usually hold for floating-point arithmetic no longer apply. The effect can extend to code not compiled with that option.
  • -mpreferred-stack-boundary and -mincoming-stack-boundary alter ABI and can break interoperability with other code and future library upgrades.
  • -O0 may improve the debugging experience while it disables all optimization, it also eliminates any hardening which depends on optimizations (such as source fortifictation/-D_FORTIFY_SOURCE=2).
  • Likewise, the sanitizer options (-fsanitize=address and so on) can be great debugging tools, but they can have unforeseen consequences when used in production builds for long-term use across multiple operating system versions. For example, the Address Sanitizer interceptors disable ABI compatibility with future library versions.

Flags for Red Hat Developer Toolset (DTS)

The -fstack-protector-strong flag is available in DTS 2.0 and later. DTS 6 and later versions support -D_GLIBCXX_ASSERTIONS. DTS 7.1 will support the -fstack-clash-protection flag. The other version specific limitations are due to system components which are not enhanced by DTS (such as glibc or the kernel), so these restrictions apply to DTS builds as well.

Language standard versions

The flags discussed so far mostly affect code generation and debugging information. An important matter specific to the C and C++ languages in particular is the selection of:

  • The system compilers in Red Hat Enterprise Linux 7 and earlier defaults to C90 for C and C++98 for C++, with many GNU extensions, some of which made it into later standards versions.
  • The Red Hat Enterprise Linux 7 system compiler is based on GCC 4.8 and supports the -std=gnu11 option for C and -std=gnu++11 option for C++. However, both C11 and C++11 support are experimental.
  • Developer Toolset (DTS) provides extensive support for newer versions of the standards, ensuring compatibility with the system libstdc++ library using a hybrid linkage model.
  • The Fedora 27 system compiler defaults to C11 and C++14 (which will change again in future Fedora versions).

In general, it is recommended to use the most recent standard version support by the toolchain, which is C99 (-std=gnu99) and C++98 (enabled by default default) for the Red Hat Enterprise Linux system compilers. For the Developer Toolset, the more recent defaults should be used. Some changes in the standards do not have perfect backwards compatibility.  As a result, a porting effort may be required to use the settings for the newer standards.

Note that even the most recent version of the GNU toolchain does not support some optional C features (such as C11 threads or Annex K and its _s functions), and C++ support is continuously evolving, especially for recent or upcoming versions of the C++ standard.

Share

The post Recommended compiler and linker flags for GCC appeared first on RHD Blog.

Non-root Open vSwitch in RHEL

$
0
0

In a few weeks, the Fast Datapath Production channel will update the Open vSwitch version from the 2.7 series to the 2.9 series. This is an important change in more ways than one. A wealth of new features and fixes all related to packet movement will come into play. One that will surely be blamed for all your troubles will be the integration of the `–ovs-user` flag to allow for an unprivileged user to interact with Open vSwitch.

Running as root can solve a lot of pesky problems. Want to write to an arbitrary file? No problem. Want to load kernel modules? Go for it! Want to sniff packets on the wire? Have a packet dump. All of these are great when the person commanding the computer is the rightful owner. But the moment the person in front of the keyboard isn’t the rightful owner, problems occur.

There’s probably an astute reader who has put together some questions about why even bother with locking down the OvS binaries to non-root users. After all, the OvS switch uses netlink to tell the kernel to move ports, and voila! It happens! That won’t be changing. But, that’s expected.

On the other hand, it would be good to restrict Open vSwitch as much as possible. As an example, there’s no need for Open vSwitch to have the kinds of privileges which allow writing new binaries to /bin. Additionally, Open vSwitch should never need access to write to Qemu disk files. These sorts of restrictions help to keep Open vSwitch confined to a smaller area of impact.

Since Open vSwitch version 2.5, the infrastructure has been available to run as a non-root user, but it always seemed a bit scary to turn it on. There were concerns about interaction with Qemu, libvirt, and DPDK. Even further, issues would really crop up with selinux. Lots of background work has been going on to address these, and after running this way for a while in Fedora, we think we’ve worked out the worst of the kinks.

So what do you need to do to ensure your Open vSwitch instance runs as a non-root user? Ideally nothing; a fresh install of the openvswitch rpm will automatically ensure that everything is configured properly to run as a non-root user. This is evident when checking with ps:

$ ps aux | grep ovs
 openvsw+ 15169 0.0 0.0 52968 2668 ? S<s 10:30 0:00 ovsdb-s
 openvsw+ 15214 200 0.3 5840636 229332 ? S<Lsl 10:30 809:16 ovs-vs

For new installs, this should be sufficient. Even DPDK devices will work when using a vfio-based PMD (most PMDs support vfio, so you really should use it).

Users who upgrade their Open vSwitch versions may find that the Open vSwitch instances run as root. This is intentional; we didn’t want to break any existing setups. Yet all of the fancy infrastructure is there allowing you to switch if you so desire. Just a few simple steps to take:

  1. Edit /etc/sysconfig/openvswitch and modify the OVS_USER_ID variable to openvswitch:hugetlbfs (or whatever user you desire)
  2. Make sure that the directories (/etc/openvswitch, /var/log/openvswitch, and /dev/vfio) have the correct ownership/permissions. This includes files and sub-directories.
  3. Start the daemon (systemctl start openvswitch).

If something goes wrong in this step, usually it will be evident in either journalctl (use journalctl -xe -u ovsdb-server for example), or in the log files.

Once the non-root changes are in effect, you could still encounter some permissions issues that aren’t evident from journalctl. The most common one is when using libvirtd to start your VMs. In that case, the default libvirt configuration (either Group=root, or Group=qemu) may not grant the correct groupid to access vhost-user sockets. This can be configured by editing the Group= setting in the /etc/libvirt/qemu.conf configuration file to match with Open vSwitch’s group (again, default is hugetlbfs).

I hope that was helpful!

Share

The post Non-root Open vSwitch in RHEL appeared first on RHD Blog.

Integrating Intercede RapID with Red Hat Mobile and OpenShift

$
0
0

At Red Hat Mobile we understand the need for a flexible product that enables our customers to integrate with the tools they need to build their current and future applications. Our position as a leading contributor to the Kubernetes project ensures that the Red Hat OpenShift Container Platform offers this tremendous flexibility to customers and end users.

Red Hat Mobile also supports highly flexible integrations to a range of 3rd party services and products. In this article, we’ll demonstrate how Red Hat Mobile v4 and OpenShift v3 enable customers to rapidly deploy and secure their mobile applications by integrating with a third party product provided by Intercede. We’ll be using Intercede’s RapID product to enable two-way TLS (often referred to as Client Certificate Authentication or CCA) for our mobile application.

A demo of the steps described in this article is available to view here:

About Intercede RapID:

Many organizations are concerned that passwords are no longer secure enough, particularly in the light of increasing legislation globally on Data Protection and Strong Authentication. Intercede’s RapID certificates can be integrated with an application’s HTTPS server to implement two-way TLS. Their RapID SDKs then facilitate certificate collection and management on a device to establish valid TLS sessions with the application server.  In addition to strong authentication, the client certificate can be utilized to “sign” blocks of data, a prerequisite for Blockchain type applications.

Prerequisites

We’ll need the following software to perform the steps outlined in this post:

  • macOS with Xcode installed (The guide will also work for Android with minor tweaks)
  • Node.js v8.x
  • Git
  • OpenSSL
  • OpenShift CLI v3.7.x
  • Docker v17.x

We’ll also need access to:

  • An Intercede account with RapID (rapidportal.intercede.com) enabled and some licenses available.
  • An OpenShift v3 instance with Red Hat Mobile v4.x installed.

This post assumes a reasonable degree of familiarity with Red Hat Mobile, OpenShift, and related technologies.

Overview

The core steps required in adding RapID to our Red Hat Mobile 4.x application are as follows:

  1. Configure two-way TLS on an HTTP server.
  2. Place the two-way TLS server between our Cloud Application (a Node.js application) and Client Application (a mobile application).
  3. Add the RapID SDK to our Client Application.
  4. Update the login flow in our application to integrate with RapID.

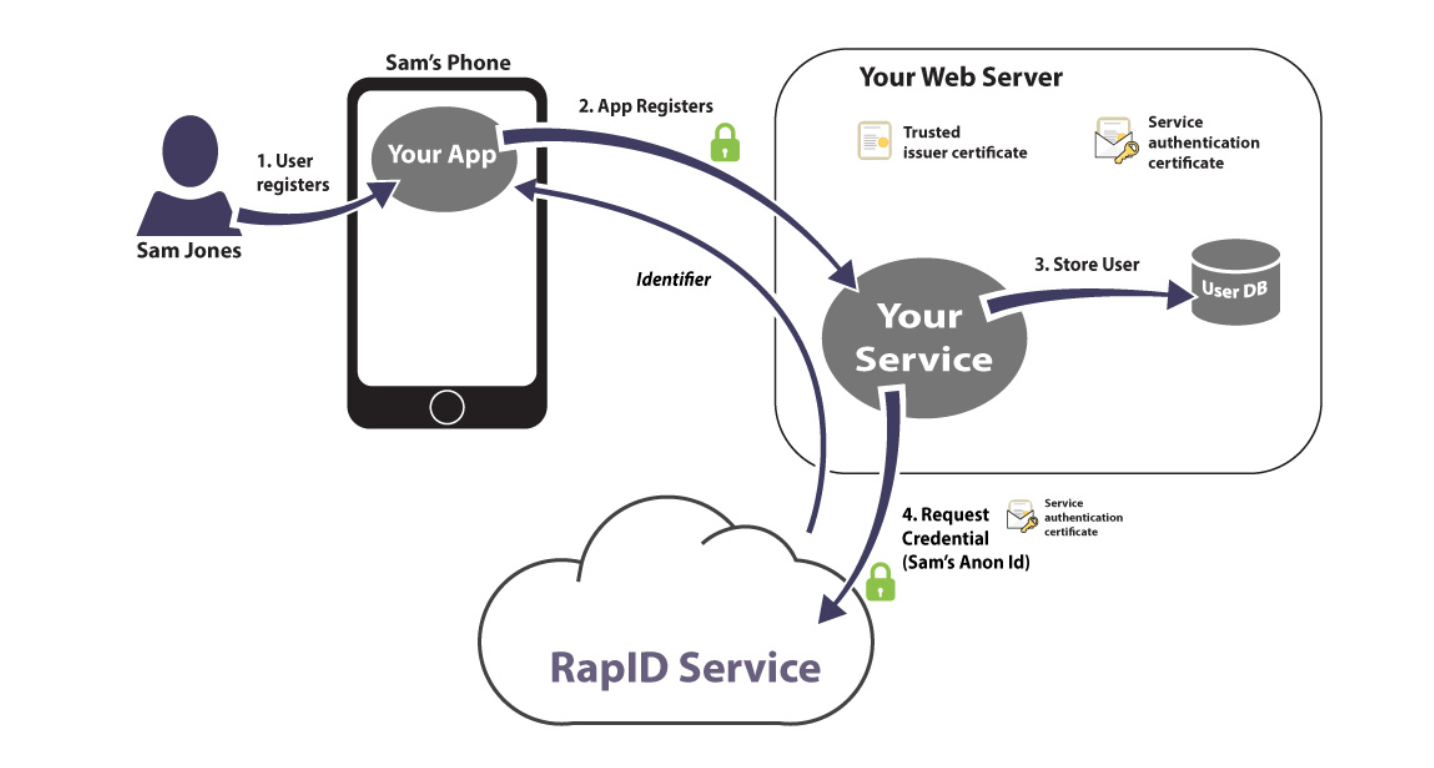
An architecture diagram by Intercede is provided below to better illustrate this:

During registration or initial login to the backend, the mobile client will use the RapID SDK to request a certificate from the RapID Certificate Authority with an identifier provided by our application backend. If this request for a certificate is successful the RapID SDK will store the resulting certificate in the device keychain and will protect it using either a fingerprint or PIN. Subsequent HTTPS requests to the mobile backend will require this certificate to be presented to authenticate with the service.

Putting this together with Red Hat Mobile on OpenShift results in the following architecture:


Creating an Application on Red Hat Mobile

In this example, we’ll start with a new application, but these steps are also valid if you’d like to integrate Intercede’s RapID with an existing mobile application deployed using Red Hat Mobile v4.x.

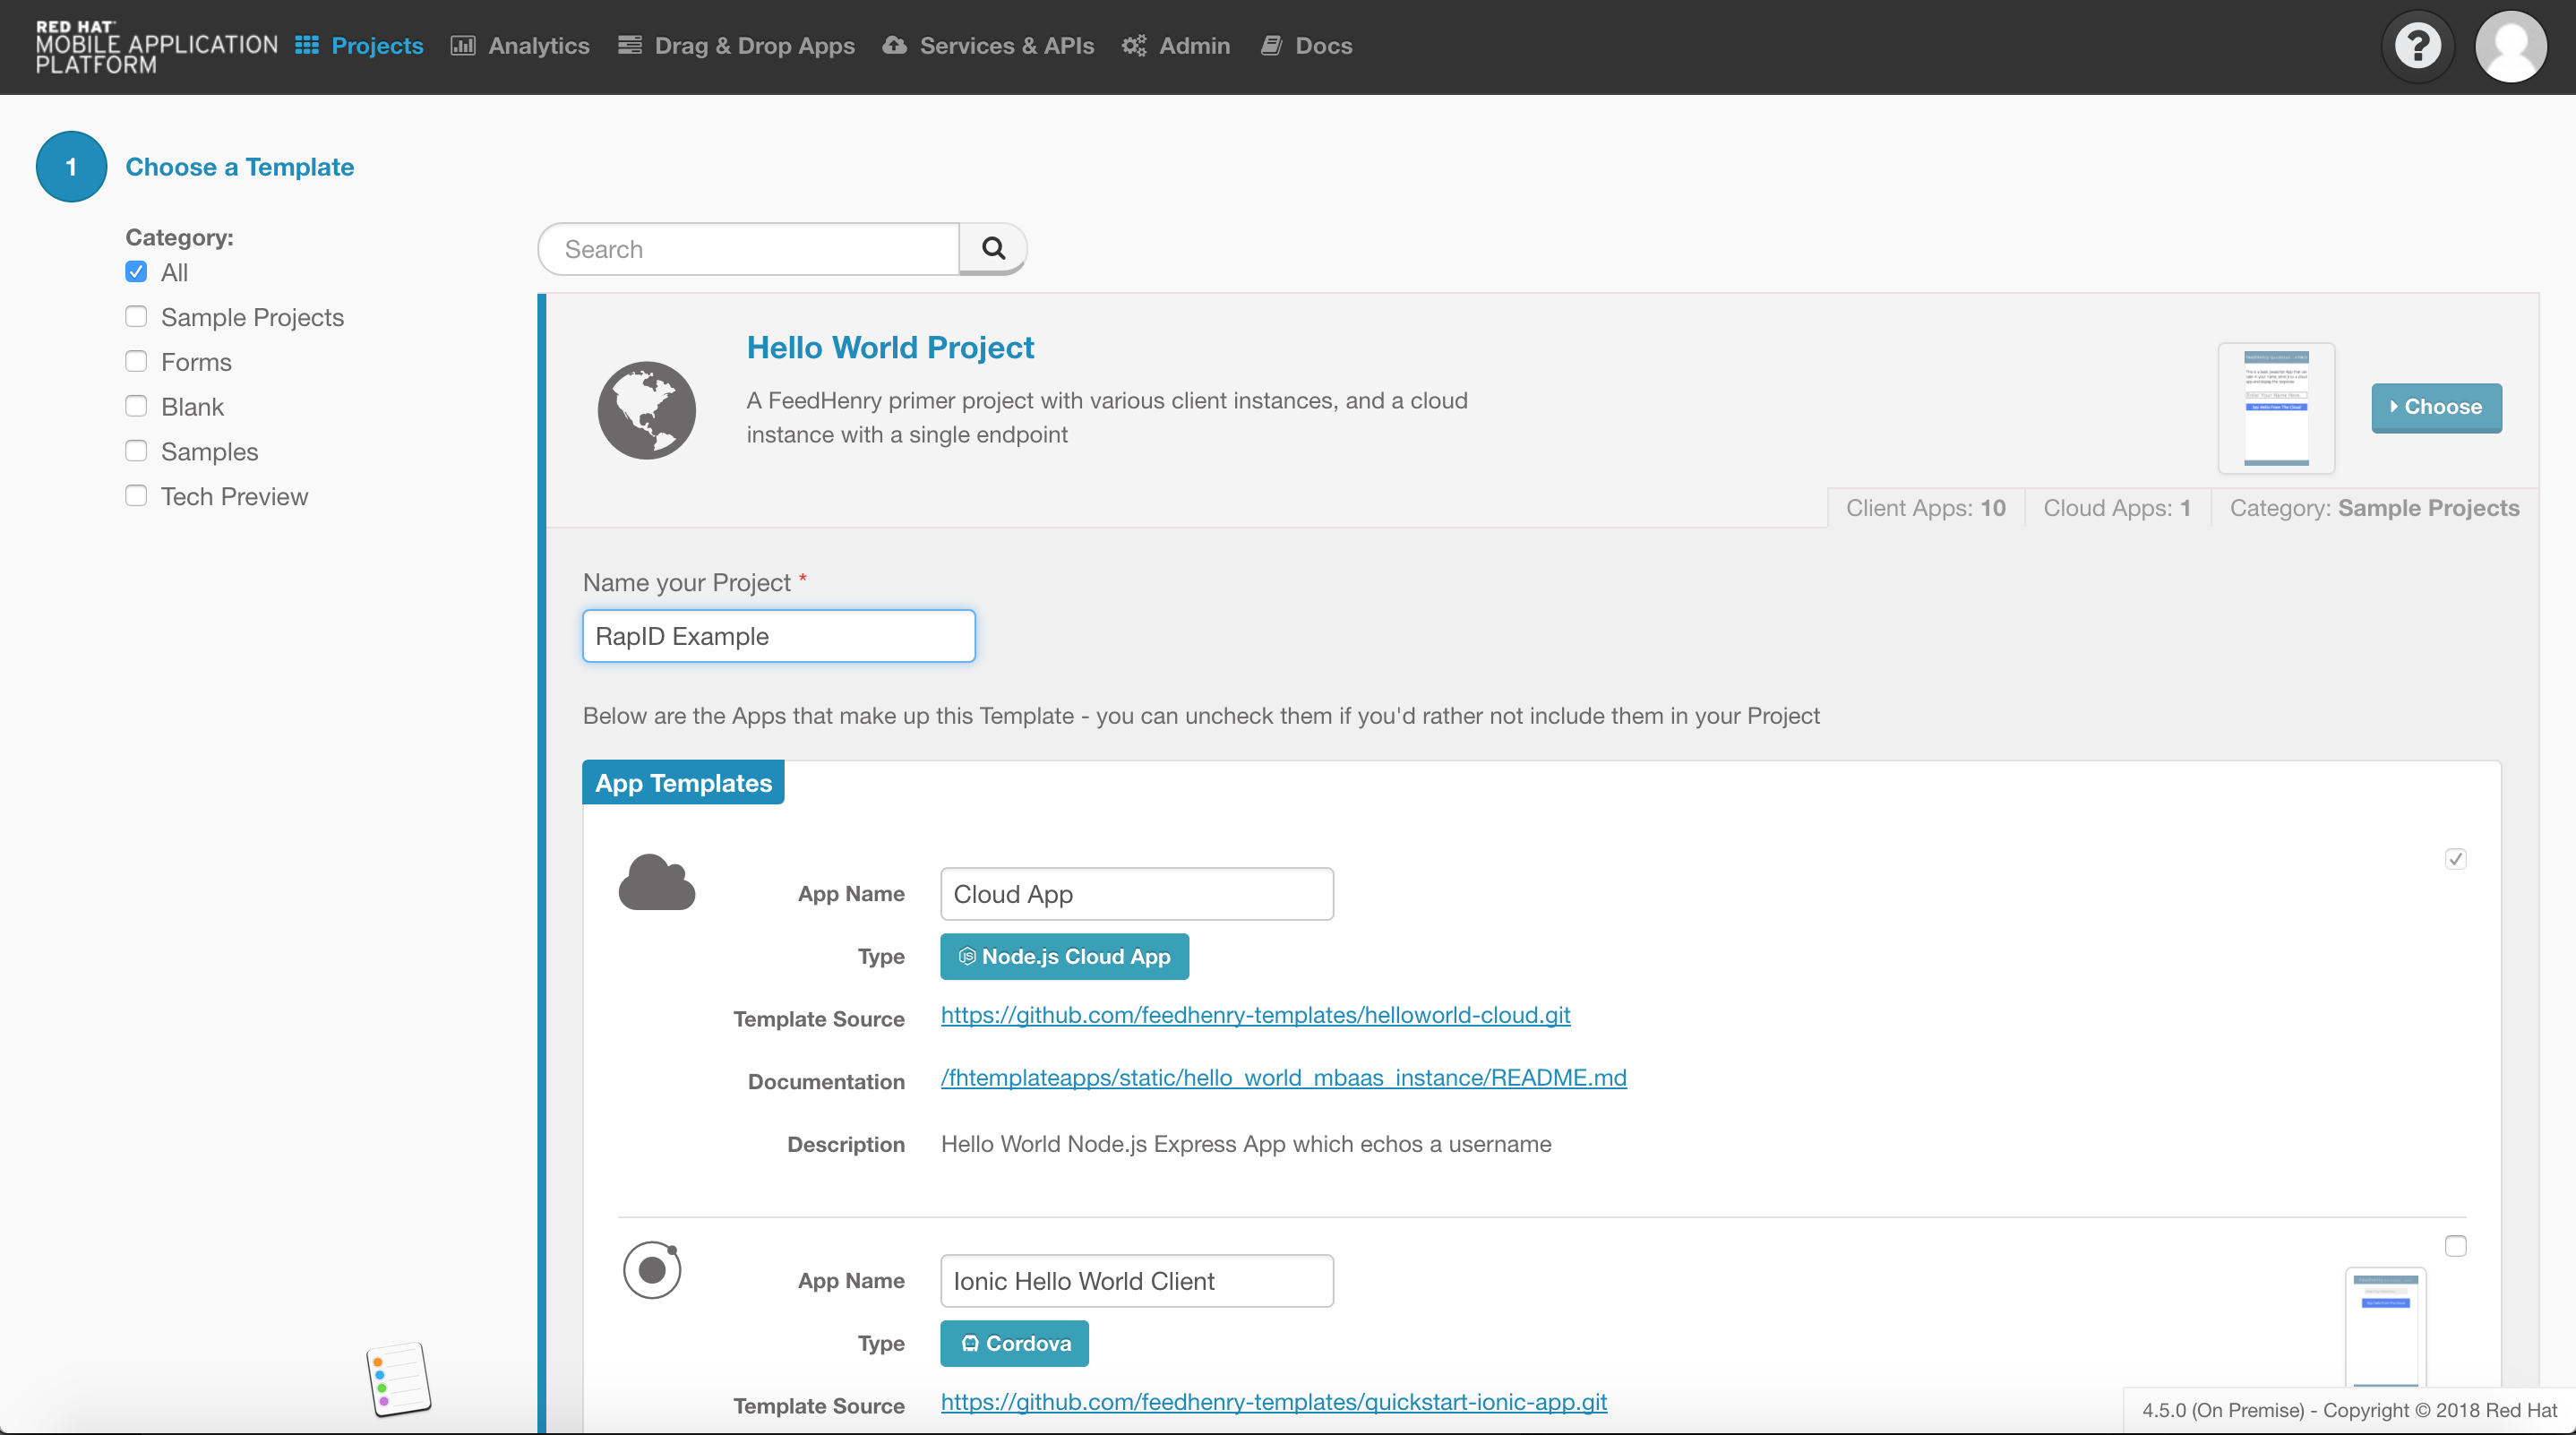
To create a new application navigate to the Projects page of the Red Hat Mobile Application Platform Studio and click the “New Project” button in the top left. On the following screen choose the “Hello World” project template, enter a name, and ensure the checkbox next to the Cordova icon is checked before clicking create:

After the creation process is complete ensure the Cloud Application of the project is deployed. We can deploy the application from the Deploy section of the Cloud Application view:

Add a Login Route

Now that we’ve created a project in Red Hat Mobile let’s add a login route to the Cloud Application portion of that project. Here’s the code we’ll be using:

app.post('/auth/login', parser, (req, res, next) => {
  const username = req.body.username;
  const password = req.body.password;

  users.validateCredentials(username, password)
  // Once a user is validated we get their anonymous ID
  // In our case this will be a UUID, but it can be another
  // unique value generated using your own technique
  .then((valid) => {
    if (valid) {
      return users.getAnonymousId(username);
    } else {
      throw new Error('authentication failed');
    }
  })
  // The anonymous ID is an indentifier we'll share with
  // RapID that identifies this user uniquely for us both
  // sends a POST to /rapid/credentials of the RapID server
  .then((anonId) => rapId.requestIdentity(anonId))
  // RapID returns a RequestID that we return to the device
  // The device uses this to retrieve an SSL certificate
  // directly from the RapID service using the mobile SDK
  .then((requestId) => {
    res.json({
      requestId: requestId
    });
  })
  // Internal server error or a login failure. Real world
  // applications would handle this more explicitly to
  // determine the exact error type and respond accordingly
  .catch((e) => next(e));
});

There’s quite a bit going on here, so let’s break it down piece by piece:

  1. app.post – Define a login endpoint in our Node.js express application.
  2. users.validateCredentials – Verify that the given username and password are correct.
  3. users.getAnonymousId – If the user is authenticated successfully (i.e. valid is truthy), then we’ll generate an anonymous ID for that user, or use a previously generated value associated with their account.
  4. rapId.requestIdentity – Request an /identity/ for our user. We pass RapID the anonymous ID we generated as a shared identifier for the user.
  5. res.json – Pass the requestId from the identity request response to the mobile device that made the login call

This flow is explained in greater detail by Intercede in their documentation, so be sure to head over to their RapID documentation for a thorough explanation of the overall architecture.

The code in the rapId module is an abstraction around the Intercede REST endpoint POST /rapid/credentials for the sake of brevity. Think of the users module as a typical abstraction in a backend for interaction with a users database table or API.

Add an API Endpoint

Now we have a login route in our Cloud Application, but we still need to create an API endpoint that we’ll secure using RapID. Since our application created from the template already has an endpoint defined under /hello let’s just change that so it looks as follows in the application.js file:

app.use('/api/hello', require('./lib/hello')())

This nests our route under the /api path. We’ve done this so that we can easily secure specific pieces of our application using RapID while leaving others exposed. For the purposes of this blog post we’ll be securing only requests to /api.

Getting Credentials for our Apache Server

Intercede provides instructions for configuring various HTTP servers, but we’ll be covering only Apache HTTPD in this blog post and will, therefore, present a modified version of their Apache HTTPD configuration guide.

Note: All the files generated in these steps should be stored in the same working directory

Using the OpenSSL commands below we’re going to generate a self-signed certificate for our server. When prompted for a password, leave it empty and press enter. When prompted for a “Common Name”, use the Applications => Route entry from the OpenShift UI but drop the HTTPS protocol prefix; e.g. nodejs-cloudappdevezqll-rhmap-rhmap-development.127.0.0.1.nip.io was used for our example application:

$ openssl genrsa -des3 -passout pass:x -out server.pass.key 2048

$ openssl rsa -passin pass:x -in server.pass.key -out server.key

$ rm server.pass.key

$ openssl req -new -key server.key -out server.csr

$ openssl x509 -req -days 365 -in server.csr -signkey server.key -out server.crt


Next, we need to get our trusted issuer certificate file from RapID. This couldn’t be easier; just head over to the RapID portal and download it from the `Server Credentials` section. Once it is downloaded rename it to trusted-ca.cer.

Creating our Apache Server Image

We will use Apache HTTPD as a reverse proxy between clients and our Node.js Cloud Application. This reverse proxy is the layer at which the Intercede RapID certificates will be deployed to ensure clients are providing their own certificates to verify their identity when accessing our API endpoints.

Since we’re deploying this application on OpenShift we need to run Apache in a container, so let’s get started by creating a dockerfile. The dockerfile provides docker with instructions on how our image should be built.

Here’s what our dockerfile will look like:


FROM registry.access.redhat.com/rhscl/httpd-24-rhel7

# Don't want to see the default welcome page...
RUN rm /etc/httpd/conf.d/welcome.conf 

# These can be generated using OpenSSL
# Details here: rapidportal.intercede.com/docs/RapID/reference_apache/
COPY server.crt /opt/app-root/ssl/server.crt
COPY server.key /opt/app-root/ssl/server.key
# You must download this from the RapID Portal
COPY trusted-ca.cer /opt/app-root/ssl/trusted-ca.cer

# Use our custom config instead of the default one
COPY conf/httpd.conf /opt/rh/httpd24/root/etc/httpd/conf/httpd.conf

# Use our own www content instead of the defaults
COPY ./www /opt/rh/httpd24/root/var/www/html

# Inform docker that we'll be exposing services on these ports
EXPOSE 8080
EXPOSE 8443

# The service name (host) and port of our node.js application
# These can be overwritten from the OpenShift Console or during the creation

ENV RHMAP_HOST 'http://nodejs-cloudappdevezqll.rhmap-rhmap-development.svc'
ENV RHMAP_PORT '8001'


The FROM statement tells docker that we’d like to create an image using Red Hat’s official httpd image that’s based on Red Hat Enterprise Linux (RHEL).  The COPY statements instruct docker to copy our certificates, keys, and www content to the specified paths in the resulting image – we’ll see these again when we create our Apache `httpd.conf` configuration file. The EXPOSE statements inform the docker that services will be exposed on those ports.

Our complete httpd.conf file is available here, but we’ll point out the important pieces in the following paragraphs.

We need to configure the server to listen on 8443 and 8080 for HTTPS and HTTP respectively using the following lines:

Listen 8080
Listen 8443

Next, we need to define our settings for our TLS/SSL connections. We did so by placing the following configuration at the end of the `httpd.conf`.

<IfModule ssl_module>
  <VirtualHost _default_:8443>
    SSLEngine on
    SSLCertificateFile      /usr/local/apache2/conf/server.crt
    SSLCertificateKeyFile   /usr/local/apache2/conf/server.key
    SSLCACertificateFile    /usr/local/apache2/conf/trusted-ca.cer
    SSLCertificateChainFile /usr/local/apache2/conf/trusted-ca.cer

    # Secure any routes under /api using two way SSL
    <Location /api/*>
      AllowMethods GET POST OPTIONS
      SSLVerifyClient require
      SSLOptions +ExportCertData +StdEnvVars +OptRenegotiate
      RequestHeader set SSL_CLIENT_CERT "%{SSL_CLIENT_CERT}s"
      ProxyPass ${RHMAP_HOST}:${RHMAP_PORT}
    </Location>

    # All other traffic will be forwarded to the application as usual
    <Location />
      AllowMethods GET POST OPTIONS
      ProxyPass ${RHMAP_HOST}:${RHMAP_PORT}/
    </Location>

  </VirtualHost>
</IfModule>

Here’s a brief explanation of the file paths it’s referencing and what they are:

  1. server.crt – Certificate we generated with OpenSSL
  2. server.key – Key we generated with OpenSSL
  3. trusted-ca.cer – Trusted certificate authority file we downloaded from the RapID portal

The following configuration dictates that any incoming request to a route nested under the /api endpoint will be protected using two-way TLS; e.g. http://my-route.openshift.com/api/orders are secured using two-way TLS. If the client doesn’t present a valid certificate when accessing these routes then the request will be rejected with a TLS error. If a valid certificate is presented then the request will be proxied to our internal service (the Cloud Application) at http://nodejs-cloudappdevezqll.rhmap-rhmap-development.svc:8001.

Finally, create a www/ folder and place an index.html inside with the following content:

<!doctype html>
<html>
    <title>RapID Sample Page</title>

    <body>
        <h2>RapID Sample Page</h2>
        <p>If you're seeing this then the RapID sample server is configured correctly</p>
    </body>
</html>

We can test our image out by running the following commands:

$ docker build -t rapid-proxy .
$ docker run -dit --name rapid-proxy -e RHMAP_HOST=http://nodejs-cloudappdevezqll.rhmap-rhmap-development.svc -e RHMAP_PORT='8001' -v "$PWD/www":/usr/local/apache2/htdocs/ -p 8443:8443 -p 8080:80 rapid-proxy

Navigating to http://localhost:8080 or https://localhost:8443 should load up the index.html we just created, but navigating to https://localhost:8443/api/test will fail with an SSL error. We can see that Google Chrome reports that the server expected a valid certificate but we couldn’t provide one:

If the server isn’t behaving as described, then take the ID that was printed by the docker run command earlier and pass it to docker logs to check for errors. Upon discovering the source of errors, make the required edits, stop and remove the image using the commands below, and then run the previous docker build and run commands again:

$ docker stop rapid-proxy
$ docker rm rapid-proxy
$ docker rmi rapid-proxy

Deploying Our Image on OpenShift

For the purposes of this post, we’ll assume that the container registry on our OpenShift instance is accessible via a public route; we have the required privileges to create an Image Stream; and we have permission to push the images to OpenShift’s internal registry.

Login using the OpenShift CLI, authenticate against the internal image registry, tag the image, and push the image tag to our registry using the following commands:

$ oc login $OSD_URL

# Set this to your OSD username
$ OC_USER=evanshortiss
# Get a login token to access the docker registry on OpenShift
$ TOKEN=$(oc whoami -t)

# The name of the project where our app is deployed
$ PROJECT_ID=rhmap-rhmap-development

# Get our docker registry url
$ REGISTRY_URL=$(oc get routes -n default | grep docker-registry | awk '{print $2}')

# Login to the openshift docker registry using 
$ docker login $REGISTRY_URL -u $OC_USER -p $TOKEN

# Tag and push your image to OpenShift's registry
$ docker tag rapid-proxy $REGISTRY_URL/$PROJECT_ID/rapid-proxy
$ docker push $REGISTRY_URL/$PROJECT_ID/rapid-proxy

In the OpenShift UI we should now be seeing both of our Image Streams: the Cloud Application and our RapID proxy image:

Deploy the RapID Proxy image we created by clicking Add to Project => Deploy Image and choosing the values shown:

Next, we’ll need to enter the RHMAP_HOST and RHMAP_PORT environment variables. The port will be 8080 or 8001, but we’ll need to find the hostname. This hostname is used by the OpenShift SDN and is available in the Project that corresponds to our development environment and the application of that project:

For example, I created and deployed my application in the development environment so I navigated to the corresponding project in the OpenShift UI and then opened Applications => Services from the side menu to view my Service that I created from Red Hat Mobile. It’ll be easy to spot the Service since the name is formatted as “nodejs-cloudappABCD”, where ”ABCD” is the last 4 characters of the Cloud Application ID.

Finally, navigate to Applications => Routes and choose the route corresponding to our Cloud Application. Choose Actions => Edit in the top right and modify the following:

  1. Change the Service field to rapid-proxy.
  2. Change the Target Port to 8443.
  3. Ensure Secure route is checked.
  4. Set TLS Termination to Passthrough.
  5. Set Insecure Traffic to None.

What we’ve done here is modify the public route of our Cloud Application so that it now routes traffic via the Apache HTTPD instance and also delegates the HTTPS session management to it.

Once this is complete we can verify that our traffic is being passed through the Apache HTTPD service by opening the URL of our Cloud Application. The result should be the bad SSL certificate error we saw when testing the image locally earlier:

We can verify our login is unrestricted by sending a request to it using our favorite HTTP client. For example, I verified I was able to login using cURL like so:

$ URL=https://nodejs-cloudappdevezqll-rhmap-rhmap-development.127.0.0.1.nip.io/auth/login

$ JSON='{"username":"eshortis@redhat.com","password":"redhat2018"}'

$ curl -k -X POST -H "content-type: application/json" --data $JSON $URL
{"requestId":"1d228803-5f3e-47a2-b496-0f66fb7dde38"}

This demonstrates that our `/auth/login` endpoint is accessible and retrieving a RequestID from the RapID service that can be returned to a Client Application to retrieve an SSL certificate from the RapID service.

Client Application Configuration

Both Intercede and Red Hat Mobile offer SDKs for development in native and hybrid environments for iOS and Android. In this section, I’ll be demonstrating how we can use these Cordova SDKs to secure a hybrid application.

Clone the project locally, and install the project dependencies using the following commands:

$ npm i -g cordova@6
$ git clone $GIT_URL client-hybrid
$ cd client-hybrid
$ npm install 

We’ll need to add the Intercede plugin to our project, so let’s do so now by using the following command; you’ll need to download the RapID Cordova SDK from Intercede before you can issue this command. Here are the values I’ve used:

$ cordova plugin add $PATH_TO_SDK --variable RAPID_ACCESS_GROUP_IDENTIFIER="com.eshortis.rapiddemo" --variable RAPID_WHITE_LIST="https://nodejs-cloudappdevezqll-rhmap-rhmap-development.127.0.0.1.nip.io"

The values provided above are placeholders that you should replace with values of your own. Here’s a brief explanation of each variable:

  • RAPID_ACCESS_GROUP_IDENTIFIER – The identifier used for storing credentials in the iOS Keychain.
  • RAPID_WHITE_LIST – A list of URLs that we will be securing with two-way TLS.

Finally, we’ll need to add a login component and some JavaScript that implements the login and fetches the client certificates using the RapID SDK. Rather than paste it all here I’ve created two GitHub Gists containing the code:

Once we’ve copied the content of those two files into the respective files in our local repository, open the project in Xcode and verify that the Keychain Sharing option is enabled under Capabilities for our application and that the correct access group has been populated as shown:

Start the application by pressing the run button or using the ⌘+R shortcut. Once the application starts, we need to take the slightly unintuitive step of closing it using the iPhone’s Home button. Once the application has closed, click and drag the server.crt file we generated using OpenSSL onto the iPhone; in a production application this would not be necessary since we would use certificates signed by a trusted certificate authority.

Following this, we’ll need to navigate to the Settings application and choose General => About => Certificate Trust Settings and enable the Full Trust For Root Certificates for the certificate we just installed:

Now, restart the application and enter a username and password. The Cloud function from the Red Hat Mobile SDK is used to send our credentials to the backend /auth/login endpoint. After a successful login the application will use the returned `requestId` from the login response to request the matching SSL certificate from RapID. Once the certificate is fetched using the RapID SDK we enter a PIN to secure it:

After our PIN and SSL certificate are stored in the device Keychain, we’re ready to hit our /api/hello endpoint. Enter a name in the field presented and press the “Say Hello From the Cloud” button. This will invoke the sendRequestEx function of the RapID SDK with our arguments and perform an HTTPS request that’s secured using two-way TLS and fetch our “Hello World” response from the Node.js application running on Red Hat Mobile Application platform:

Conclusion

We’ve successfully integrated Intercede’s RapID solution to our application and achieved the following:

  1. A two-way TLS to block requests from unknown devices to our JSON API.
  2. An embedded a certificate in the device keychain that can be shared by any applications we develop.
  3. The ability to improve the user experience by using the RapID certificate and SDK to authenticate users in other applications.

Share

The post Integrating Intercede RapID with Red Hat Mobile and OpenShift appeared first on RHD Blog.

Red Hat Summit 2018: Develop Secure Apps and Services

$
0
0

Red Hat Summit 2018 will focus on modern application development. A critical part of modern application development is of course securing your applications and services. Things were challenging when you only needed to secure a single monolithic application. In a modern application landscape, you’re probably looking at building microservices and possibly exposing application services and APIs outside the boundaries of your enterprise. In order to deploy cloud-native applications and microservices you must be able to secure them. You might be faced with the challenge of securing both applications and back-end services accessed by mobile devices while using third party identity providers like social networks. Fortunately, Red Hat Summit 2018 has a number of developer-oriented sessions where you can learn how to secure your applications and services, integrate single-sign on, and manage your APIs. Session highlights include:

Red Hat Summit 2018 security sessions for developers

I’m a developer. What do I need to know about security?

SpeakersGordon HaffJennifer Krieger

Abstract: As DevOps breaks down traditional silos, fewer and fewer things are exclusively “someone else’s problem.” Everyone should have some knowledge of good security practices, to give just one example.  In this interactive session, we’ll delve into security topics like common problem areas, shifting security left, automation, and more. We’ll answer questions like:

  • How can you make containers secure?
  • What is the low hanging fruit and what are good things to start with?
  • How can people who aren’t traditional security professionals engage with those who are?
  • How will new open source projects like Istio change things?

Bring your questions to learn from Red Hat experts and from each other.


Securing apps and services with Red Hat Single Sign-On

Speakers: Stian ThorgersenSébastien Blanc

Abstract: If you have a number of applications and services, the applications may be HTML5, server-side, or mobile, while the services may be monolithic or microservices, deployed on-premise or to the cloud. You may have started looking at using a service mesh. Now, you need to easily secure all these applications and services.

Securing applications and services is no longer just about assigning a username and password. You need to manage identities. You need two-factor authentication. You need to integrate with legacy and external authentication systems. Your list of other requirements may be long. But you don’t want to develop all of this yourself—nor should you.

In this session, we’ll demonstrate how to easily secure all your applications and services—regardless of how they’re implemented and hosted—with Red Hat single sign-on. After this session, you’ll know how to secure your HTML5 application or service, deployed to a service mesh and everything in between. Once your applications and services are secured with Red Hat single sign-on, you’ll know how to easily adopt single sign-on, two-factor authentication, social login, and other security capabilities.


Securing service mesh, microservices, and modern applications with JSON Web Token (JWT)

Speakers: Stian ThorgersenSébastien Blanc

Abstract: Sharing identity and authorization information between applications and services should be done with an open industry standard to ensure interoperability in heterogeneous environments. Javascript Object Signing and Encryption (JOSE) is a framework for securely sharing such information between heterogeneous applications and services.

In this session, we’ll cover the specifications of the JOSE framework, focusing especially on JSON Web Token (JWT). We’ll discuss practical applications of the JOSE framework, including relevant specifications, such as OpenID Connect. After this session, you’ll have an understanding of the specifications and how to easily adopt them using Red Hat single sign-on or another OpenID Connect provider.


Red Hat API management: Overview, security models, and roadmap

Speakers: Nicolas MasseMark Cheshire

Abstract: In this session, you’ll learn a framework to evaluate different API security models—including API keys, mutual SSL certificates, and OpenID Connect—and how to choose the right one for your architecture needs. We’ll demonstrate applying API access controls to different real-world scenarios. Finally, we’ll share a preview of the roadmap for Red Hat 3scale API Management.


Best practices for securing the container life cycle

Speakers: Laurent DombKirsten Newcomer

Abstract: IT organizations are using container technology and DevOps processes to bring new-found agility to delivering applications that create business value. However, enterprise use requires strong security at every stage of the life cycle. Nothing is secure by default—security takes work. You need defense in depth. Red Hat delivers multiple layers of security controls throughout your applications, infrastructure, and processes to help you minimize security risks.

In this session, Red Hat’s Laurent Domb and Kirsten Newcomer will identify the 10 most common layers in a typical container deployment and deliver a deep-dive on best practices for securing containers through the CI/CD process, including verifying container provenance, creating security gates and policies, and managing updates to deployed containers.


Distributed API management in a hybrid cloud environment

Speakers: Thomas Siegrist (Swiss Federal Railways), Christian Sanabria (IPT), Christoph Eberle (Red Hat)

Abstract: Swiss Railways operates a substantial Red Hat OpenShift hybrid cloud installation, hosting many thousand containers. Introducing microservices at scale and moving to hybrid container infrastructures introduces a new set of challenges. What about security, life cycle, dependencies, governance, and self-service with thousands of services on a hybrid environment?

To handle the enormous growth of APIs, an API management platform based on 3scale by Red Hat on-premise and Red Hat single sign-on (SSO) was built, integrating internal and external IdPs. The solution is portable, scalable, and highly available, and all processes are automated and available as self service. The platform is in production, serving multiple critical internal and external APIs targeting 100K+ API calls per second.

In this session, you will learn about the benefits of building a fully automated self-service API management and SSO platform in a distributed, hybrid environment, how we approached the project, what challenges we faced, and how we solved them.


DevSecOps with disconnected Red Hat OpenShift

Speakers: Mike Battles (Red Hat), Chase Barrette (MITRE Corporation), Stuart Bain (Red Hat), Jeremy Sontag (Red Hat)

Abstract: MITRE and Red Hat Consulting worked together with the U.S. Air Force Program Management Office to develop a system that fulfills the mission requirements of a containerized DevSecOps platform. Using an Infrastructure-as-Code model, the team was able to produce a self-contained, bootable DVD that automates the installation of Red Hat OpenShift Container Platform and related components, with the following characteristics:

  • Dev—Replicable, consistent runtime environment across multiple sites. Extends native deployment pipeline functionality to support development through production via air-gapped, secure environments.
  • Sec—Secured out of the box via automation and hardening tools to comply with U.S. Government security baselines, STIG, and FIPS requirements via OpenSCAP and Red Hat Ansible Automation. STIG-compliant reference configurations for Red Hat JBoss EAP, Red Hat JBoss AMQ, and PostgreSQL.
  • Ops—Fully autonomous installation of Red Hat OpenShift, Red Hat CloudForms, container-native storage with Red Hat Gluster Storage, and Red Hat Enterprise Linux into a bare metal or virtual environment.

OpenShift + Single sign-on = Happy security teams and happy users

Speakers: Dustin MinnichJosh CainJared BlashkaBrian Atkisson

Abstract: One username and password to rule them all.

In this lab, we’ll discuss and demonstrate single sign-on technologies and how to implement them using Red Hat products. We’ll take you through bringing up an OpenShift cluster in a development environment, installing Red Hat single sign-on on top of it, and then integrating that with a variety of example applications.


Shift security left—and right—in the container life cycle

Speakers: Siamak SadeghianfarKirsten Newcomer

Abstract: The black hat hackers of the world are making the internet a challenging place and have forced all of us to spend a tremendous amount of time securing our systems and apps. In this BOF, join Red Hat and partners AquaSecurity, Black Duck, Sonatype, and Twistlock for a conversation about shifting security left—and right—in the container lifecycle. if you aren’t familiar with the shift-left principle, attend the session to find out how it helps you to improve container security.


Don’t miss Red Hat Summit 2018

Red Hat Summit 2018 is May 8th – 10th in San Francisco, CA at the Moscone Center.  Register early to save on a full conference pass.


Share

The post Red Hat Summit 2018: Develop Secure Apps and Services appeared first on RHD Blog.

Using .NET Core in a “Disconnected” Environment

$
0
0

Security is a very important consideration when running your custom middleware applications.  The internet can be an unfriendly place.

Sometimes middleware users have a requirement for their software to run in a “‘disconnected” environment, which is one where the network is not routed to addresses outside the one the local node is on—in other words, no internet.


.NET Core applications, such as Java applications built using Maven or Node applications built with npm, often require access to external sources for the libraries they need. With .NET Core, this is often the public NuGet repository.

So what does this mean to .NET Core users in a disconnected environment? It means they cannot build their applications! The requested libraries will not be accessible, so the build will not succeed (at least not in the default configuration).

What about running the application?  Luckily, running the application is possible. Once your application is built, you can move the generated binaries to a machine in a disconnected environment where they will properly run. (The same is true of “published” applications, which are explicitly meant to be portable.)

Security-conscious users can build applications in an “exposed” environment, examine the artifacts to ensure they contain only verified libraries, and then can confidently move them to the disconnected environment.

Happy coding!

Share

The post Using .NET Core in a “Disconnected” Environment appeared first on RHD Blog.

Why Kubernetes is The New Application Server

$
0
0

Have you ever wondered why you are deploying your multi-platform applications using containers? Is it just a matter of “following the hype”? In this article, I’m going to ask some provocative questions to make my case for Why Kubernetes is the new application server.

You might have noticed that the majority of languages are interpreted and use “runtimes” to execute your source code. In theory, most Node.js, Python, and Ruby code can be easily moved from one platform (Windows, Mac, Linux) to another platform. Java applications go even further by having the compiled Java class turned into a bytecode, capable of running anywhere that has a JVM (Java Virtual Machine).

The Java ecosystem provides a standard format to distribute all Java classes that are part of the same application. You can package these classes as a JAR (Java Archive), WAR (Web Archive), and EAR (Enterprise Archive) that contains the front end, back end, and libraries embedded. So I ask you: Why do you use containers to distribute your Java application? Isn’t it already supposed to be easily portable between environments?

Answering this question from a developer perspective isn’t always obvious. But think for a moment about your development environment and some possible issues caused by the difference between it and the production environment:

  • Do you use Mac, Windows, or Linux? Have you ever faced an issue related to \ versus / as the file path separator?
  • What version of JDK do you use? Do you use Java 10 in development, but production uses JRE 8? Have you faced any bugs introduced by  JVM differences?
  • What version of the application server do you use? Is the production environment using the same configuration, security patches, and library versions?
  • During production deployment, have you encountered a JDBC driver issue that you didn’t face in your development environment due to different versions of the driver or database server?
  • Have you ever asked the application server admin to create a datasource or a JMS queue and it had a typo?

All the issues above are caused by factors external to your application, and one of the greatest things about containers is that you can deploy everything (for example, a Linux distribution, the JVM, the application server, libraries, configurations and, finally, your application) inside a pre-built container. Plus, executing a single container that has everything built in is incredibly easier than moving your code to a production environment and trying to resolve the differences when it doesn’t work. Since it’s easy to execute, it is also easy to scale the same container image to multiple replicas.

Empowering Your Application

Before containers became very popular, several NFR (non-functional requirements) such as security, isolation, fault tolerance, configuration management, and others were provided by application servers. As an analogy, the application servers were planned to be to applications what CD (Compact Disc) players are to CDs.

As a developer, you would be responsible to follow a predefined standard and distribute the application in a specific format, while on the other hand the application server would “execute” your application and give additional capabilities that could vary from different “brands.”  Note: In the Java world, the standard for enterprise capabilities provided by an application server has recently moved under the Eclipse foundation. The work on Eclipse Enterprise for Java (EE4J), has resulted in Jakarta EE.  (For more info, read the article Jakarta EE is officially out or watch the DevNation video: Jakarta EE: The future of Java EE.)

Following the same CD player analogy, with the ascension of containers, the container image has become the new CD format. In fact, a container image is nothing more than a format for distributing your containers. (If you need to get a better handle on what container images are and how they are distributed see A Practical Introduction to Container Terminology.)

The real benefits of containers happen when you need to add enterprise capabilities to your application. And the best way to provide these capabilities to a containerized application is by using Kubernetes as a platform for them. Additionally, the Kubernetes platform provides a great foundation for other projects such as Red Hat OpenShift, Istio, and Apache OpenWhisk to build on and make it easier to build and deploy robust production quality applications.

Let’s explore nine of these capabilities:

1 – Service Discovery

Service discovery is the process of figuring out how to connect to a service.  To get many of the benefits of containers and cloud-native applications, you need to remove configuration from your container images so you can use the same container image in all environments. Externalized configuration from applications is one of the key principles of the 12-factor application. Service discovery is one of the ways to get configuration information from the runtime environment instead of it being hardcoded in the application. Kubernetes provides service discovery out of the box. Kubernetes also provides ConfigMaps and Secrets for removing configuration from your application containers.  Secrets solve some of the challenges that arise when you need to store the credentials for connecting to a service like a database in your runtime environment.

With Kubernetes, there’s no need to use an external server or framework.  While you can manage the environment settings for each runtime environment through Kubernetes YAML files, Red Hat OpenShift provides a GUI and CLI that can make it easier for DevOps teams to manage.

2 – Basic Invocation

Applications running inside containers can be accessed through Ingress access— in other words, routes from the outside world to the service you are exposing. OpenShift provides route objects using HAProxy, which has several capabilities and load-balancing strategies.  You can use the routing capabilities to do rolling deployments. This can be the basis of some very sophisticated CI/CD strategies. See “6 – Build and Deployment Pipelines” below.

What if you need to run a one-time job, such as a batch process, or simply leverage the cluster to compute a result (such as computing the digits of Pi)? Kubernetes provides job objects for this use case. There is also a cron job that manages time-based jobs.

3 – Elasticity

Elasticity is solved in Kubernetes by using ReplicaSets (which used to be called Replication Controllers). Just like most configurations for Kubernetes, a ReplicaSet is a way to reconcile a desired state: you tell Kubernetes what state the system should be in and Kubernetes figures out how to make it so. A ReplicaSet controls the number of replicas or exact copies of the app that should be running at any time.

But what happens when you build a service that is even more popular than you planned for and you run out of compute? You can use the Kubernetes Horizontal Pod Autoscaler, which scales the number of pods based on observed CPU utilization (or, with custom metrics support, on some other application-provided metrics).

4 – Logging

Since your Kubernetes cluster can and will run several replicas of your containerized application, it’s important that you aggregate these logs so they can be viewed in one place. Also, in order to utilize benefits like autoscaling (and other cloud-native capabilities), your containers need to be immutable. So you need to store your logs outside of your container so they will be persistent across runs. OpenShift allows you to deploy the EFK stack to aggregate logs from hosts and applications, whether they come from multiple containers or even from deleted pods.

The EFK stack is composed of:

  • Elasticsearch (ES), an object store where all logs are stored
  • Fluentd, which gathers logs from nodes and feeds them to Elasticsearch
  • Kibana, a web UI for Elasticsearch

5 – Monitoring

Although logging and monitoring seem to solve the same problem, they are different from each other. Monitoring is observation, checking, often alerting, as well as recording. Logging is recording only.

Prometheus is an open-source monitoring system that includes time series database. It can be used for storing and querying metrics, alerting, and using visualizations to gain insights into your systems. Prometheus is perhaps the most popular choice for monitoring Kubernetes clusters. On the Red Hat Developers blog, there are several articles covering monitoring using Prometheus. You can also find Prometheus articles on the OpenShift blog.

You can also see Prometheus in action together with Istio at https://learn.openshift.com/servicemesh/3-monitoring-tracing.

6 – Build and Deployment Pipelines

CI/CD (Continuous Integration/Continuous Delivery) pipelines are not a strict “must have” requirement for your applications. However, CI/CD are often cited as pillars of successful software development and DevOps practices.  No software should be deployed into production without a CI/CD pipeline. The book Continuous Delivery: Reliable Software Releases through Build, Test, and Deployment Automation, by Jez Humble and David Farley, says this about CD: “Continuous Delivery is the ability to get changes of all types—including new features, configuration changes, bug fixes and experiments—into production, or into the hands of users, safely and quickly in a sustainable way.”

OpenShift provides CI/CD pipelines out of the box as a “build strategy.” Check out this video that I recorded two years ago, which has an example of a Jenkins CI/CD pipeline that deploys a new microservice.

7 – Resilience

While Kubernetes provides resilience options for the cluster itself, it can also help the application be resilient by providing PersistentVolumes that support replicated volumes. Kubernetes’ ReplicationControllers/deployments ensure that the specified numbers of pod replicas are consistently deployed across the cluster, which automatically handles any possible node failure.

Together with resilience, fault tolerance serves as an effective means to address users’ reliability and availability concerns. Fault tolerance can also be provided to an application that is running on Kubernetes through Istio by its retries rules, circuit breaker, and pool ejection. Do you want to see it for yourself? Try the Istio Circuit Breaker tutorial at https://learn.openshift.com/servicemesh/7-circuit-breaker.

8 – Authentication

Authentication in Kubernetes can also be provided by Istio through its mutual TLS authentication, which aims to enhance the security of microservices and their communication without requiring service code changes. It is responsible for:

  • Providing each service with a strong identity that represents its role to enable interoperability across clusters and clouds
  • Securing service-to-service communication and end user-to-service communication
  • Providing a key management system to automate key and certificate generation, distribution, rotation, and revocation

Additionally, it is worth mentioning that you can also run Keycloak inside a Kubernetes/OpenShift cluster to provide both authentication and authorization. Keycloak is the upstream product for Red Hat Single Sign-on. For more information, read Single-Sign On Made Easy with Keycloak. If you are using Spring Boot, watch the DevNation video: Secure Spring Boot Microservices with Keycloak or read the blog article.

9 – Tracing

Istio-enabled applications can be configured to collect trace spans using Zipkin or Jaeger. Regardless of what language, framework, or platform you use to build your application, Istio can enable distributed tracing. Check it out at https://learn.openshift.com/servicemesh/3-monitoring-tracing.  See also Getting Started with Istio and Jaeger on your laptop and the recent DevNation video: Advanced microservices tracing with Jaeger.

Are Application Servers Dead?

Going through these capabilities, you can realize how Kubernetes + OpenShift + Istio can really empower your application and provide features that used to be the responsibility of an application server or a software framework such as Netflix OSS. Does that mean application servers are dead?

In this new containerized world, application servers are mutating into becoming more like frameworks. It’s natural that the evolution of software development caused the evolution of application servers. A great example of this evolution is the Eclipse MicroProfile specification having WildFly Swarm as the application server, which provides to the developer features such as fault tolerance, configuration, tracing, REST (client and server), and so on. However, WildFly Swarm and the MicroProfile specification are designed to be very lightweight. WildFly Swarm doesn’t have the vast array of components required by a full Java enterprise application server. Instead, it focuses on microservices and having just enough of the application server to build and run your application as a simple executable .jar file.  You can read more about MicroProfile on this blog.

Furthermore, Java applications can have features such as the Servlet engine, a datasource pool, dependency injection, transactions, messaging, and so forth. Of course, frameworks can provide these features, but an application server must also have everything you need to build, run, deploy, and manage enterprise applications in any environment, regardless of whether they are inside containers. In fact, application servers can be executed anywhere, for instance, on bare metal, on virtualization platforms such as Red Hat Virtualization, on private cloud environments such as Red Hat OpenStack Platform, and also on public cloud environments such as Microsoft Azure or Amazon Web Services.

A good application server ensures consistency between the APIs that are provided and their implementations. Developers can be sure that deploying their business logic, which requires certain capabilities, will work because the application server developers (and the defined standards) have ensured that these components work together and have evolved together. Furthermore, a good application server is also responsible for maximizing throughput and scalability, because it will handle all the requests from the users; having reduced latency and improved load times, because it will help your application’s disposability; be lightweight with a small footprint that minimizes hardware resources and costs; and finally, be secure enough to avoid any security breach. For Java developers, Red Hat provides Red Hat JBoss Enterprise Application Platform, which fulfills all the requirements of a modern, modular application server.

Conclusion

Container images have become the standard packaging format to distribute cloud-native applications. While containers “per se” don’t provide real business advantages to applications, Kubernetes and its related projects, such as OpenShift and Istio, provide the non-functional requirements that used to be part of an application server.

Most of these non-functional requirements that developers used to get from an application server or from a library such as Netflix OSS were bound to a specific language, for example, Java. On the other hand, when developers choose to meet these requirements using Kubernetes + OpenShift + Istio, they are not attached to any specific language, which can encourage the use of the best technology/language for each use case.

Finally, application servers still have their place in software development. However, they are mutating into becoming more like language-specific frameworks that are a great shortcut when developing applications, since they contain lots of already written and tested functionality.

One of the best things about moving to containers, Kubernetes, and microservices is that you don’t have to choose a single application server, framework, architectural style or even language for your application. You can easily deploy a container with JBoss EAP running your existing Java EE application, alongside other containers that have new microservices using Wildfly Swarm, or Eclipse Vert.x for reactive programming. These containers can all be managed through Kubernetes. To see this concept in action, take a look at Red Hat OpenShift Application Runtimes. Use the Launch service to build and deploy a sample app online using WildFly Swarm, Vert.x, Spring Boot, or Node.js. Select the Externalized Configuration mission to learn how to use Kubernetes ConfigMaps. This will get you started on your path to cloud-native applications.

You can say that Kubernetes/OpenShift is the new Linux or even that “Kubernetes is the new application server.” But the fact is that an application server/runtime + OpenShift/Kubernetes + Istio has become the “de facto” cloud-native application platform!


If you haven’t been to the Red Hat Developer site lately, you should check out the pages on:

Rafael Benevides

About the author:

Rafael Benevides is Director of Developer Experience at Red Hat. With many years of experience in several fields of the IT industry, he helps developers and companies all over the world to be more effective in software development. Rafael considers himself a problem solver who has a big love for sharing. He is a member of Apache DeltaSpike PMC—a Duke’s Choice Award winner project—and a speaker in conferences such as JavaOne, Devoxx, TDC, DevNexus, and many others.| LinkedIn | rafabene.com

Share

The post Why Kubernetes is The New Application Server appeared first on RHD Blog.


Setting up RBAC on Red Hat AMQ Broker

$
0
0

One thing that is common in the enterprise world, especially in highly regulated industries, is to have separation of duties. Role-based access controls (RBAC) have built-in support for separation of duties. Roles determine what operations a user can and cannot perform. This post provides an example of how to configure proper RBAC on top of Red Hat AMQ, a flexible, high-performance messaging platform based on the open source Apache ActiveMQ Artemis project.

In most of the cases, separation of duties on Red Hat AMQ can be divided into three primary roles:

  1. Administrator role, which will have all permissions
  2. Application role, which will have permission to publish, consume, or produce messages to a specific address, subscribe to topics or queues, or create and delete addresses.
  3. Operation role, which will have read-only permission via the web console or supported protocols

To implement those roles, Red Hat AMQ has several security features that need be configured, as described in the following sections.

AMQ Broker authentication

Out of the box, AMQ ships with the Java Authentication and Authorization Service (JAAS) security manager. It provides a default PropertiesLogin JAAS login module that reads user, password, and roles information from properties files (artemis-users.properties and artemis-roles.properties).

Thus, to add a user and role, we can use this artemis command:

// artemis user add --user <username> --password <password> --role <role_comma_seperated>

For example, to add three users and their roles—one user with the Administrator role, one user with the Application role, and one user with the Operation role—we can use an artemis command such as this:

$ artemis user add --user amqadmin --password amqadmin --role amqadmin
$ artemis user add --user amqapps --password amqapps --role amqapps
$ artemis user add --user amqops --password amqops --role amqops

On top of that, Red Hat AMQ also provides other authentication plugins. For more information, see the official documentation.

AMQ Broker authorization

AMQ Broker authorization policies provide a flexible, role-based security model for applying security to queues based on their respective addresses. For instance, operations such as publishing, consuming, and producing a message to an address as well as creating and deleting an address are supported out of the box. In addition, the policies support protocols such as AMQP, OpenWire, MQTT, STOMP, HornetQ, and the native Artemis Core protocol. To clarify, authorization policies are not meant for setting the permission of the web console.

To configure permissions, we can edit the broker.xml file in the etc folder. By default, it has eight different permissions per address pattern. Thus, to implement the above roles, we can use permissions like this:

<security-settings>
  <security-setting match="#">
    <permission type="createNonDurableQueue" roles="amqadmin,amqapps"/>
    <permission type="deleteNonDurableQueue" roles="amqadmin,amqapps"/>
    <permission type="createDurableQueue" roles="amqadmin,amqapps"/>
    <permission type="deleteDurableQueue" roles="amqadmin,amqapps"/>
    <permission type="createAddress" roles="amqadmin,amqapps"/>
    <permission type="deleteAddress" roles="amqadmin,amqapps"/>
    <permission type="consume" roles="amqadmin,amqapps"/>
    <permission type="browse" roles="amqadmin,amqapps,amqops"/>
    <permission type="send" roles="amqadmin,amqapps"/>
    <!-- we need this; otherwise ./artemis data imp wouldn't work -->
    <permission type="manage" roles="amqadmin,amqapps"/>
  </security-setting>
</security-settings>

Based on the example above, only users belonging to roles amqadminand amqapps have permission to do operations (send/consume/browse/manage messages) to an AMQ address (queue/topic) as well as create and delete queues. In contrast, users belonging to the amqops role have permission only to browse an address for monitoring purposes.

AMQ web console authorization

The web console in RedHat AMQ is based on Hawtio, which reads JMX operations using Jolokia. Therefore, to configure the permissions for the web console, we need to set the JMX permission. Specifically, it can be set through the management.xml file in the same folder as the broker.xml file (the etc folder). In short, to implement the primary roles described above, we can implement something like the following:

<role-access>
  <match domain="org.apache.activemq.artemis" >
    <access method="list*" roles="amqops,amqadmin"/>
    <access method="get*" roles="amqops,amqadmin"/>
    <access method="is*" roles="amqops,amqadmin"/>
    <access method="set*" roles="amqadmin"/>
    <access method="browse*" roles="amqops,amqadmin"/>
    <access method="create*" roles="amqadmin"/>
    <access method="delete*" roles="amqadmin"/>
    <access method="send*" roles="amqadmin"/>
    <access method="*" roles="amqadmin"/>
  </match>
</role-access>

To sum up, only users belonging to amqadmin have full permissions. However, amqops users have read-only permission to monitor the broker using the web console. Similarly, the amqapps role has no permission to use any JMX operation nor to log in through the web console.

Furthermore, the example above shows us that the method setting for a permission is actually a pattern for a JMX operation. It is important to realize that a role that is allowed to log in to the web console is read from the Java system property hawtio.role. Hence, we need to configure the etc/artemis.profile file as shown in the example below:

JAVA_ARGS=" -XX:+PrintClassHistogram -XX:+UseG1GC -XX:+AggressiveOpts 
-XX:+UseFastAccessorMethods 
-Xms512M -Xmx2G -Dhawtio.realm=activemq  
-Dhawtio.offline="true" -Dhawtio.role="amqadmin,amqops" 
-Dhawtio.rolePrincipalClasses=org.apache.activemq.artemis.spi.core.security.jaas.RolePrincipal 
-Djolokia.policyLocation=${ARTEMIS_INSTANCE_ETC_URI}jolokia-access.xml 
-Djon.id=amq"

In the example configuration above, the only thing that needed to be changed is -Dhawtio.role="amqadmin,amqops", which specifies the roles (comma-delimited) that are allowed to log in.

Conclusion

By configuring the features described above, you can implement proper RBAC on top of Red Hat AMQ to improve security and enforce separation of duties. It is especially important to do this if you are in a highly regulated industry.

For more information on users and roles in Red Hat AMQ Broker, see the Users and Roles chapter of the Using AMQ Broker guide.

Share

The post Setting up RBAC on Red Hat AMQ Broker appeared first on RHD Blog.

Firewalld: The Future is nftables

$
0
0

Firewalld, the default firewall management tool in Red Hat Enterprise Linux and Fedora, has gained long sought support for nftables. This was announced in detail on firewalld’s project blog. The feature landed in the firewalld 0.6.0 release as the new default firewall backend.

The benefits of nftables have been outlined on the Red Hat Developer Blog:

There are many longstanding issues with firewalld that we can address with nftables that were not possible with the old iptables backend. The nftables backend allows the following improvements:

  • all firewall information viewable with a single underlying tool, nft
  • single rule for both IPv4 and IPv6 instead of duplicating rules
  • does not assume complete control of firewall backend
  • won’t delete firewall rules installed by other tools or users
  • rule optimizations (log and deny in same rule)

Most important of all, the new backend is nearly 100% compatible with preexisting configurations. Most users won’t even notice something changed. This means even slower moving distributions should be able to pick up the new version.

You can get started with firewalld and nftables today! firewalld 0.6.0 is already available in Fedora rawhide and will be in the upcoming Fedora 29 release. Existing Fedora installs will automatically be upgraded to the nftables backend when they upgrade to Fedora 29.

Unfortunately firewalld’s nftables backend is unlikely to find it’s way to Red Hat Enterprise Linux 7. The good news is since Fedora is RHEL’s upstream it is likely that the nftables backend will eventually make it into some future RHEL release.

For further details please refer to the upstream blog post on firewalld.org. Happy firewalling!

Share

The post Firewalld: The Future is nftables appeared first on RHD Blog.

How to enable sudo on RHEL

$
0
0

You’ve probably seen tutorials that use sudo for running administrative commands as root. However when you try it, you get told your user ID is “not in the sudoers file, this incident will be reported.”  For developers, sudo can be very useful for running steps that require root access in build scripts.

This article covers:

  • How to configure sudo access on Red Hat Enterprise Linux (RHEL) so you won’t need to use su and keep entering the root password
  • Configuring sudo to not ask for your password
  • How to enable sudo during system installation
  • Why sudo seems to work out of the box for some users and not others

TL;DR: Basic sudo

To enable sudo for your user ID on RHEL, add your user ID to the wheel group:

  1. Become root by runningsu
  2. Run usermod -aG wheel your_user_id
  3. Log out and back in again

Now you will be able to use sudo when logged in under your normal user ID. You will be asked to enter the password for your user ID when you run a sudo command. For the next five minutes, sudo will remember that you’ve been authenticated, so you won’t be asked for your password again.

This works because the default /etc/sudoers file on RHEL contains the following line:

%wheel  ALL=(ALL)  ALL

That line enables all users in group wheel to run any command with sudo, but users will be asked to prove their identity with their password.  Note: there is no comment symbol (#) in front of that line.

After logging out and back in again, you can verify that you are in group wheel by running the id command:

$ id
uid=1000(rct) gid=10(wheel) groups=10(wheel),1000(rct)

Using sudo without a password

You can also configure sudo to not ask for a password to verify your identity. For many situations (such as for real servers) this is would be considered too much of a security risk. However, for developers running a RHEL VM on their laptop, this is a reasonable thing to do since access to their laptops is probably already protected by a password.

To set this up, two different methods are shown. You can either edit /etc/sudoers or you can create a new file in /etc/sudoers.d/.  The first is more straightforward, but the latter is easier to script and automate.


Edit /etc/sudoers

As root, run visudo to edit /etc/sudoers and make the following changes. The advantage of using visudo is that it will validate the changes to the file.

The default /etc/sudoers file contains two lines for group wheel; the NOPASSWD: line is commented out.  Uncomment that line and comment out the wheel line without NOPASSWD. When you are done, it should look like this:

## Allows people in group wheel to run all commands
# %wheel ALL=(ALL) ALL

## Same thing without a password
%wheel ALL=(ALL) NOPASSWD: ALL

Alternate method: Create a new file in /etc/sudoers.d

You can create files in /etc/sudoers.d that will be part of the sudo configuration. This method is easier to script and automate. Also, since this doesn’t involve changing groups, you won’t have to log out and back in again. Change your_id to your user ID.

$ su -
# echo -e “your_id\tALL=(ALL)\tNOPASSWD: ALL" > /etc/sudoers.d/020_sudo_for_me

# cat /etc/suders.d/020_my_sudo
your_id ALL=(ALL) NOPASSWD: ALL

Enable sudo during system installation

During RHEL system installation, you can enable sudo for the user you create during the installation. There is an often overlooked (and misunderstood) Make this user administrator option on the User Creation screen where you enter the user ID and password. If you select the Make this user administrator box, the user will be made part of the wheel group during the installation.

I have to admit, I overlooked this option and didn’t understand what it did until I stumbled on this article in Fedora Magazine. While the article is about Fedora, this functionality is essentially the same for RHEL, since Fedora is the upstream community project that is used as the basis for RHEL.

For me, this finally cleared up the mystery of whys sudo seem to work out of the box for some RHEL users but not others. This isn’t really explained well in the RHEL installation guide.

RHEL 7 Install Create User

For more information

Share

The post How to enable sudo on RHEL appeared first on RHD Blog.

Securing apps and services with Keycloak (Watch DevNation Live video)

$
0
0

The video from the last DevNation Live: Securing apps and services with Keycloak is now available to watch online.  In this session, you will learn how to secure web/HTML5 applications, single-page and mobile applications, and services with Keycloak. Keycloak can be used to secure traditional monolithic applications as well as microservices and service mesh-based applications that need secure end-to-end authentication for all front- and back-end services. The examples in the video cover PHP, Node.js, and HTML/JavaScript.

Securing applications and services is no longer just about assigning a username and password. You need to manage identities. You need to integrate with legacy and external authentication systems to provide features that are in demand like social logins and single sign-on (SSO). Your list of other requirements may be long. But you don’t want to develop all of this yourself, nor should you.

In this session, Red Hat’s Stian Thorgensen, who is an engineering lead for Red Hat Single Sign-On and the community project lead on the Keycloak open source identity and access management software project, takes you through actual code and the underlying concepts.

Agenda

  • Brief overview of Keycloak
  • OpenID Connect and OAuth 2.0 vs SAML v2.0
    • When to use OIDC and when to use SAML
  • Adapters for securing applications and services with Keycloak
  • Data/process flows for:
    • Securing a traditional/monolithic application
    • Securing a single-page or mobile app
    • Securing back-end services to provide end-to-end authentication of front-end and back-end services
  • Examples covering:
    • HTML5/JavaScript
    • PHP
    • REST service with Node.js


Resources and more information


For a deeper dive into Keycloak, join us Thursday, September 20th, 2018 at 12 p.m. EDT for DevNation Live

Share

The post Securing apps and services with Keycloak (Watch DevNation Live video) appeared first on RHD Blog.

How to set up LDAP authentication for the Red Hat AMQ 7 message broker console

$
0
0

This post is a continuation of the series on Red Hat AMQ 7 security topics for developers and ops people started by Mary Cochran.  We will see how to configure LDAP authentication on a Red Hat AMQ 7 broker instance. In order to do so, we will go perform the followings actions:

  • Set up a simple LDAP server with a set of users and groups using Apache Directory Studio.
  • Connect Red Hat AMQ 7 to LDAP using authentication providers.
  • Enable custom LDAP authorization policies in Red Hat AMQ 7.


Set up the LDAP server

In this tutorial, we will rely on Apache Directory Studio to quickly set up a simple LDAP server with the following structure:

Apache Directory Studio screenshot

You can use this github.com/nelvadas/amq7_ldap_lab/blob/master/ldap.ldif file to reproduce the LDAP environment. From your root directory, import the ldap.diff file.

Importing the LDIF file

Then, select the file you want to import,  select the Update existing entries checkbox, and import the file.

Selecting the LDAP file

For demonstration and simplicity purposes, all user passwords have been set to redhat, for example:

jdoe/redhat, enonowoguia/redhat…

The Dind DN username and password to access LDAP server is admin/secret.

Once the LDAP server is set up and started, we can check the existing users with the following ldapsearch command:

$ ldapsearch -H ldap://localhost:11389 -x -D "uid=admin,ou=system" -w "secret" -b "ou=Users,dc=example,dc=com" -LLL cn
dn: cn=John+sn=Doe+uid=jdoe,ou=Users,dc=example,dc=com
cn: John

dn: cn=Elvadas NONO+uid=enonowoguia,ou=Users,dc=example,dc=com
cn: elvadas nono

dn: ou=Users,dc=example,dc=com

dn: cn=demo+uid=demo,ou=Users,dc=example,dc=com
cn: demo

In the same context, we may want to display the different groups of  user jdoe:

$ ldapsearch -H ldap://localhost:11389 -x -D "uid=admin,ou=system" -w "secret" -b "ou=Groups,dc=example,dc=com" "(member=cn=John+sn=Doe+uid=jdoe,ou=Users,dc=example,dc=com)" -LL cn
# extended LDIF
#
# LDAPv3
# base <ou=Groups,dc=example,dc=com> with scope subtree
# filter: (member=cn=John+sn=Doe+uid=jdoe,ou=Users,dc=example,dc=com)
# requesting: -LL cn
#

# Administrator, Groups, example.com
dn: cn=Administrator,ou=Groups,dc=example,dc=com
cn: Administrator

# AMQGroup, Groups, example.com
dn: cn=AMQGroup,ou=Groups,dc=example,dc=com
cn: AMQGroup

# search result
search: 2
result: 0 Success

# numResponses: 3
# numEntries: 2

At this point, we have set up our LDAP server and made sure it is up and running by using various ldapsearch commands.

In the next section, we will configure Red Hat AMQ to authenticate users from LDAP and allow only users from AMQGroup to access the Management console and publish messages in queues.

Start the Red Hat AMQ 7 Broker

Red Hat AMQ 7 is a  lightweight, high-performance, robust messaging platform freely available for development use through Red Hat Developer Program.

Download and unzip the last version on your computer:

$ unzip ~/Downloads/amq-broker-7.1.1-bin.zip
$ cd amq-broker-7.1.1/bin

Create a broker instance with the default authentication mechanism:

$ ./bin/artemis create ../../brokers/amq7-broker1 --name amq7-node1 --user admin --password admin --allow-anonymous
Creating ActiveMQ Artemis instance at: /Users/enonowog/Documents/Missions/Blog/amq7ldap/brokers/amq7-broker1

Auto tuning journal ...
done! Your system can make 16.67 writes per millisecond, your journal-buffer-timeout will be 59999

You can now start the broker by executing this command:

"/Users/enonowog/Documents/Missions/Blog/amq7ldap/brokers/amq7-broker1/bin/artemis" run

Or you can run the broker in the background using this command:

"/Users/enonowog/Documents/Missions/Blog/amq7ldap/brokers/amq7-broker1/bin/artemis-service" start

Start the broker as a background process.

$ cd ../brokers
$ "./amq7-broker1/bin/artemis-service" start
Starting artemis-service
artemis-service is now running (2804)

Access the management console at http://localhost:8161/console/login:

Accessing the AMQ 7 Management Console with the default Admin user

Accessing the Red Hat AMQ 7 Management Console with the default Admin user

In the next section, we will see how to rely on the previously set up LDAP server to authenticate users.

Configure LDAP authentication

In order to enable LDAP authentication, the first step is to change the default etc/login.config file to add the LDAP authentication provider.

Add the LDAP authentication provider

You can retrieve a working example here.

$ cd brokers/amq7-broker1/etc/
MacBook-Pro-de-elvadas:etc enonowog$ cat <<EOF> login.config
> activemq {
>
>   org.apache.activemq.artemis.spi.core.security.jaas.LDAPLoginModule required
>      debug=true
>      initialContextFactory=com.sun.jndi.ldap.LdapCtxFactory
>      connectionURL="ldap://localhost:11389"
>      connectionUsername="uid=admin,ou=system"
>      connectionPassword=secret
>      connectionProtocol=s
>      authentication=simple
>      userBase="ou=Users,dc=example,dc=com"
>      userSearchMatching="(uid={0})"
>      userSearchSubtree=true
>      roleBase="ou=Groups,dc=example,dc=com"
>      roleName=cn
>      roleSearchMatching="(member={0})"
>      roleSearchSubtree=false
>      reload=true
>   ;
>
> };
> EOF

This file contains your LDAP configuration and states that the JAAS LDAPLoginModule is required. Connection parameters such as the  LDAP URL and the Bind BD user details are provided.

For example, UserBase="ou=Users,dc=example,dc=com"defines the organizationalUnit from which users will be found. And userSearchMatching="(uid={0})" indicates users will be authenticated based on their UID.

roleBase="ou=Groups,dc=example,dc=com" defines the base group in which user searches will be performed.

Define the Hawtio console role

The etc/artemis.profile file defines the LDAP group you want to grant access to the management console. In that file, replace the -Dhawtio.role=amq with your LDAP group: -Dhawtio.role=AMQGroup.

# Java Opts
 JAVA_ARGS=" -XX:+PrintClassHistogram -XX:+UseG1GC -XX:+AggressiveOpts -XX:+UseFastAccessorMethods -Xms512M -Xmx2G 
-Dhawtio.realm=activemq -Dhawtio.offline="true" -Dhawtio.role=amq 
-Dhawtio.rolePrincipalClasses=org.apache.activemq.artemis.spi.core.security.jaas.RolePrincipal 
-Djolokia.policyLocation=${ARTEMIS_INSTANCE_URI}/etc/jolokia-access.xml -Djon.id=amq"

You can do that by running the following command:

sed -i.bak 's/hawtio.role=amq/hawtio.role=AMQGroup/g' artemis.profile

You should now be able to log on to the management console using your LDAP credentials (jdoe/redhat).

LDAP management console authentification

Test and debug

To see what is happening behind the scenes, you can enable debug logs on the spi core security package.

Edit the etc/logging.properties file.

Add the org.apache.activemq.artemis.spi.core.security package to the root loggers.

Also add the DEBUG logging level for this package:

logger.org.apache.activemq.artemis.spi.core.security.level=DEBUG

Then restart your Red Hat AMQ instance.

# Additional logger names to configure (root logger is always configured)
 19 # Root logger option
 20 loggers=...,org.apache.activemq.artemis.integration.bootstrap
,org.apache.activemq.artemis.spi.core.security
 21 # Root logger level
 22 logger.level=INFO
 23 # ActiveMQ Artemis logger levels
 24 logger.org.apache.activemq.artemis.core.server.level=INFO
 25 logger.org.apache.activemq.artemis.journal.level=INFO
 26 logger.org.apache.activemq.artemis.utils.level=INFO
 27 logger.org.apache.activemq.artemis.jms.level=INFO
 28 logger.org.apache.activemq.artemis.integration.bootstrap.level=INFO
 29 logger.org.apache.activemq.artemis.spi.core.security.level=DEBUG
 30 logger.org.eclipse.jetty.level=WARN
 31 # Root logger handlers
 32 logger.handlers=FILE,CONSOLE

You can see which roles are retrieved when the user tries to authenticate with LDAP:

2018-06-15 17:26:18,824 INFO [org.apache.activemq.artemis] AMQ241001: HTTP Server started at http://localhost:8161
2018-06-15 17:26:18,825 INFO [org.apache.activemq.artemis] AMQ241002: Artemis Jolokia REST API available at http://localhost:8161/console/jolokia
2018-06-15 17:26:18,825 INFO [org.apache.activemq.artemis] AMQ241004: Artemis Console available at http://localhost:8161/console
2018-06-15 17:26:31,794 INFO [io.hawt.web.LoginServlet] hawtio login is using 1800 sec. HttpSession timeout
2018-06-15 17:26:31,814 DEBUG [org.apache.activemq.artemis.spi.core.security.jaas.LDAPLoginModule] Create the LDAP initial context.
2018-06-15 17:26:31,826 DEBUG [org.apache.activemq.artemis.spi.core.security.jaas.LDAPLoginModule] Get the user DN.
2018-06-15 17:26:31,826 DEBUG [org.apache.activemq.artemis.spi.core.security.jaas.LDAPLoginModule] Looking for the user in LDAP with
2018-06-15 17:26:31,826 DEBUG [org.apache.activemq.artemis.spi.core.security.jaas.LDAPLoginModule] base DN: ou=Users,dc=example,dc=com
2018-06-15 17:26:31,827 DEBUG [org.apache.activemq.artemis.spi.core.security.jaas.LDAPLoginModule] filter: (uid=jdoe)
2018-06-15 17:26:31,830 DEBUG [org.apache.activemq.artemis.spi.core.security.jaas.LDAPLoginModule] LDAP returned a relative name: cn=John+sn=Doe+uid=jdoe
2018-06-15 17:26:31,831 DEBUG [org.apache.activemq.artemis.spi.core.security.jaas.LDAPLoginModule] Using DN [cn=John+sn=Doe+uid=jdoe,ou=Users,dc=example,dc=com] for binding.
2018-06-15 17:26:31,831 DEBUG [org.apache.activemq.artemis.spi.core.security.jaas.LDAPLoginModule] Binding the user.
2018-06-15 17:26:31,834 DEBUG [org.apache.activemq.artemis.spi.core.security.jaas.LDAPLoginModule] User cn=John+sn=Doe+uid=jdoe,ou=Users,dc=example,dc=com successfully bound.
2018-06-15 17:26:31,834 DEBUG [org.apache.activemq.artemis.spi.core.security.jaas.LDAPLoginModule] Get user roles.
2018-06-15 17:26:31,834 DEBUG [org.apache.activemq.artemis.spi.core.security.jaas.LDAPLoginModule] Looking for the user roles in LDAP with
2018-06-15 17:26:31,834 DEBUG [org.apache.activemq.artemis.spi.core.security.jaas.LDAPLoginModule] base DN: ou=Groups,dc=example,dc=com
2018-06-15 17:26:31,834 DEBUG [org.apache.activemq.artemis.spi.core.security.jaas.LDAPLoginModule] filter: (member=cn=John+sn=Doe+uid=jdoe,ou=Users,dc=example,dc=com)
2018-06-15 17:26:31,839 DEBUG [org.apache.activemq.artemis.spi.core.security.jaas.LDAPLoginModule] Roles [Administrator, AMQGroup] for user jdoe

In this part, we defined authentication policies, but what about authorizations?

Enable custom authorizations to LDAP groups

To grant specific roles to your LDAP group, edit the broker.xml configuration file and set specific permissions for your role:

<security-settings>
<security-setting match="#">
<permission type="createNonDurableQueue" roles="amq,AMQGroup"/>
<permission type="deleteNonDurableQueue" roles="amq"/>
<permission type="createDurableQueue" roles="amq,AMQGroup"/>
<permission type="deleteDurableQueue" roles="amq"/>
<permission type="createAddress" roles="amq,AMQGroup"/>
<permission type="deleteAddress" roles="amq,AMQGroup"/>
<permission type="consume" roles="amq,AMQGroup"/>
<permission type="browse" roles="amq,AMQGroup"/>
<permission type="send" roles="amq,AMQGroup"/>
<!-- we need this otherwise ./artemis data imp wouldn't work -->
<permission type="manage" roles="amq,AMQGroup"/>
</security-setting>
</security-settings>

When the permissions are defined, they are automatically ingested by the running Red Hat AMQ instance. You can now produce a set of messages using the jdoe user.

$ ./artemis producer --url tcp://localhost:61616 --user jdoe --password redhat --destination queue://RH_DEV_BLOG --message-count 10
Producer ActiveMQQueue[RH_DEV_BLOG], thread=0 Started to calculate elapsed time ...
Producer ActiveMQQueue[RH_DEV_BLOG], thread=0 Produced: 10 messages
Producer ActiveMQQueue[RH_DEV_BLOG], thread=0 Elapsed time in second : 0 s
Producer ActiveMQQueue[RH_DEV_BLOG], thread=0 Elapsed time in milli second : 50 milli seconds

Conclusion

In this blog post, we saw how to set up a simple LDAP directory using Apache Directory Studio and configured LDAP authentication on Red Hat AMQ 7 for both messaging operations and the management console with custom authorization policies.


Share

The post How to set up LDAP authentication for the Red Hat AMQ 7 message broker console appeared first on RHD Blog.

Viewing all 54 articles
Browse latest View live